6. Buildroot Application
6.1 Display
EM3568 supports HDMI/LVDS dual-display.
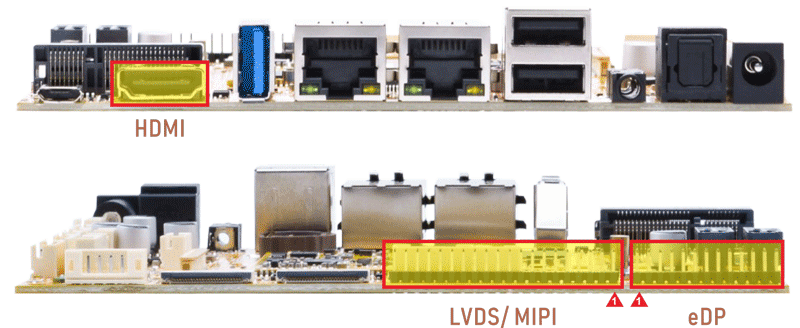
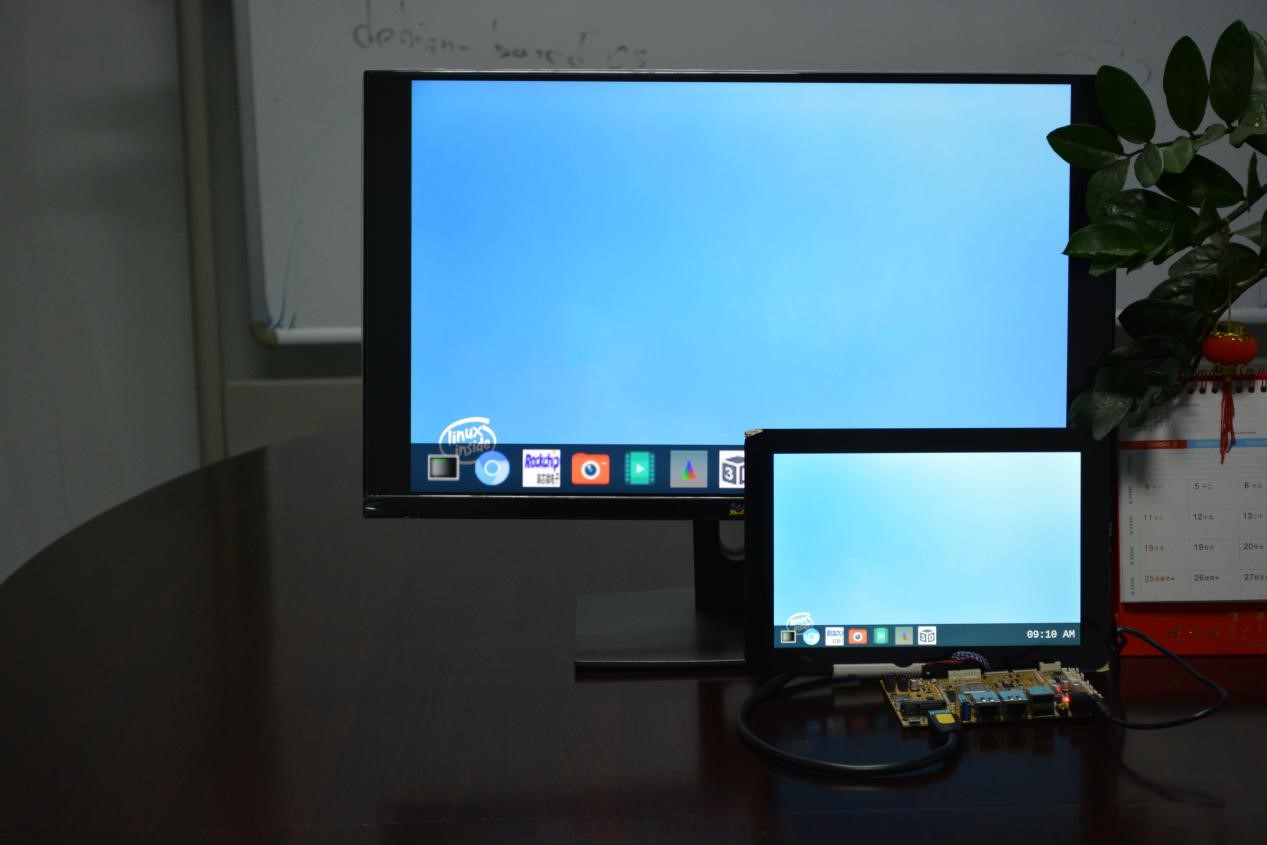
If only HDMI is in use, user can turn off the LVDS.
1echo off > /sys/class/drm/card0-LVDS-1/status
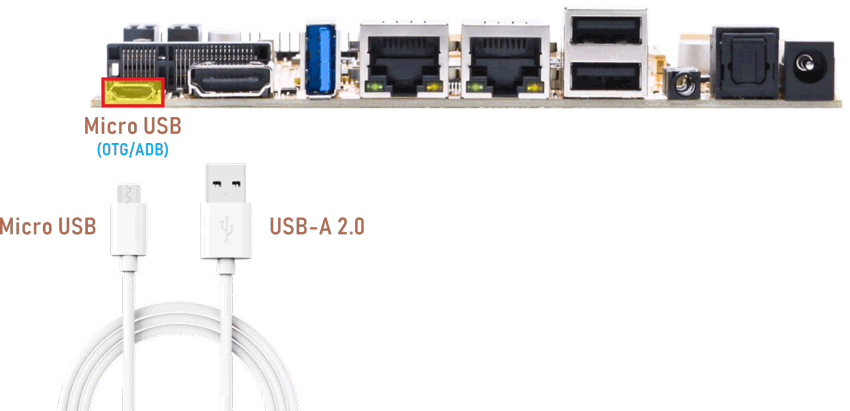
6.2 ADB
The micro USB is mainly used for firmware upgrades and ADB function.
ADB is the command-line debugging tool. It can use for system logs, uploading and downloading the files, installing the applications, etc.
❶ connect the board and PC host with Micro USB cable.
❷ install ADB driver on Windows system.
❸ press Windows + R to open the Run program. Type cmd and press Enter
❹ execute the command to enable ADB.
1adb shell
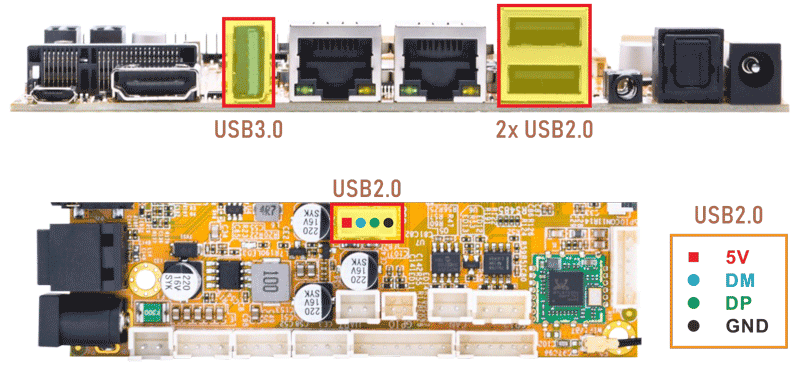
6.3 USB Host
1df -h //view the auto-mounted USB device
root@rk3568-buildroot:/# df -h
Filesystem      Size  Used Avail Use% Mounted on
/dev/root       5.9G  679M  5.0G  12% /
devtmpfs        970M  8.0K  970M   1% /dev
tmpfs           981M  236K  981M   1% /tmp
tmpfs           981M  492K  981M   1% /run
tmpfs           981M     0  981M   0% /dev/shm
/dev/mmcblk0p7  121M   12M  103M  11% /oem
/dev/mmcblk0p8  911M  140K  848M   1% /userdata
/dev/mmcblk1p1   15G  3.0G   12G  20% /mnt/sdcard
/dev/sda1        59G   20G   39G  34% /mnt/udisk
The USB3.0 default support Superspeed.
root@rk3568-buildroot:/#
[  360.495104] usb 6-1: new SuperSpeed Gen 1 USB device number 3 using xhci-hcd
[  360.514263] usb 6-1: New USB device found, idVendor=3535, idProduct=6300, bcdDevice= 1.10
[  360.514344] usb 6-1: New USB device strings: Mfr=1, Product=2, SerialNumber=3
[  360.514373] usb 6-1: Product: U330
[  360.514397] usb 6-1: Manufacturer: aigo
[  360.514421] usb 6-1: SerialNumber: 52A7B285B4956ADF
[  360.516943] usb-storage 6-1:1.0: USB Mass Storage device detected
[  360.518882] scsi host2: usb-storage 6-1:1.0
[  360.520837] pwm-backlight backlight1: supply power not found, using dummy regulator
[  361.529024] scsi 2:0:0:0: Direct-Access     aigo     U330             PMAP PQ: 0 ANSI: 6
[  361.530228] sd 2:0:0:0: [sda] 122880000 512-byte logical blocks: (62.9 GB/58.6 GiB)
[  361.530829] sd 2:0:0:0: [sda] Write Protect is off
[  361.531470] sd 2:0:0:0: [sda] Write cache: disabled, read cache: enabled, doesn't support DPO or FUA
[  361.685925]  sda: sda1
6.4 SD Card
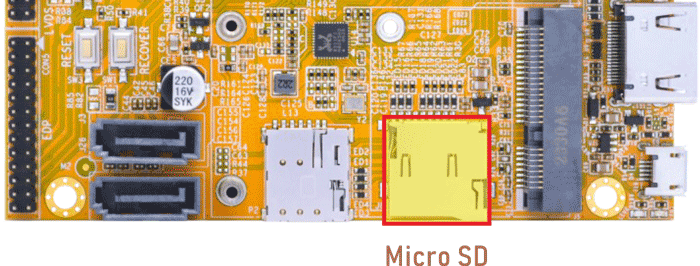
df -h //view the auto-mounted SD Card
root@rk3568-buildroot:/# df -h
Filesystem      Size  Used Avail Use% Mounted on
/dev/root       5.9G  679M  5.0G  12% /
devtmpfs        970M  8.0K  970M   1% /dev
tmpfs           981M  236K  981M   1% /tmp
tmpfs           981M  480K  981M   1% /run
tmpfs           981M     0  981M   0% /dev/shm
/dev/mmcblk0p7  121M   12M  103M  11% /oem
/dev/mmcblk0p8  911M  140K  848M   1% /userdata
/dev/mmcblk1p1   15G  3.0G   12G  20% /mnt/sdcard
6.5 Ethernet
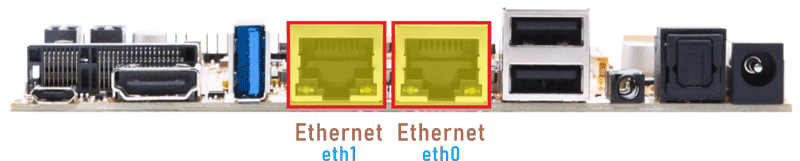
❶ Connect the board and router with the Ethernet cable.
❷ check the network interface status.
1ifconfig
root@rk3568-buildroot:/# ifconfig
eth0      Link encap:Ethernet  HWaddr 5E:42:CA:03:D9:2E
          inet addr:192.168.0.145  Bcast:192.168.0.255  Mask:255.255.255.0
          inet6 addr: fe80::a7a7:ac9:9390:9572/64 Scope:Link
          UP BROADCAST RUNNING MULTICAST  MTU:1500  Metric:1
          RX packets:50 errors:0 dropped:0 overruns:0 frame:0
          TX packets:19 errors:0 dropped:0 overruns:0 carrier:0
          collisions:0 txqueuelen:1000
          RX bytes:4885 (4.7 KiB)  TX bytes:1830 (1.7 KiB)
          Interrupt:53

eth1      Link encap:Ethernet  HWaddr 5A:42:CA:03:D9:2E
          inet addr:192.168.0.150  Bcast:192.168.0.255  Mask:255.255.255.0
          inet6 addr: fe80::ab46:29cf:8a76:33f5/64 Scope:Link
          UP BROADCAST RUNNING MULTICAST  MTU:1500  Metric:1
          RX packets:63 errors:0 dropped:0 overruns:0 frame:0
          TX packets:18 errors:0 dropped:0 overruns:0 carrier:0
          collisions:0 txqueuelen:1000
          RX bytes:6263 (6.1 KiB)  TX bytes:1740 (1.6 KiB)
          Interrupt:57

lo        Link encap:Local Loopback
          inet addr:127.0.0.1  Mask:255.0.0.0
          inet6 addr: ::1/128 Scope:Host
          UP LOOPBACK RUNNING  MTU:65536  Metric:1
          RX packets:0 errors:0 dropped:0 overruns:0 frame:0
          TX packets:0 errors:0 dropped:0 overruns:0 carrier:0
          collisions:0 txqueuelen:1000
          RX bytes:0 (0.0 B)  TX bytes:0 (0.0 B)

p2p0      Link encap:Ethernet  HWaddr B6:6D:C2:58:2E:40
          UP BROADCAST MULTICAST  MTU:1500  Metric:1
          RX packets:0 errors:0 dropped:0 overruns:0 frame:0
          TX packets:0 errors:0 dropped:0 overruns:0 carrier:0
          collisions:0 txqueuelen:1000
          RX bytes:0 (0.0 B)  TX bytes:0 (0.0 B)

wlan0     Link encap:Ethernet  HWaddr B4:6D:C2:58:2E:40
          UP BROADCAST MULTICAST  MTU:1500  Metric:1
          RX packets:0 errors:0 dropped:0 overruns:0 frame:0
          TX packets:0 errors:0 dropped:0 overruns:0 carrier:0
          collisions:0 txqueuelen:1000
          RX bytes:0 (0.0 B)  TX bytes:0 (0.0 B)
❸ Use the ping command to test the network.
ping -I eth0 www.boardcon.com       //test eth0
ping -I eth1 www.boardcon.com       //test eth1
6.6 Audio I/O
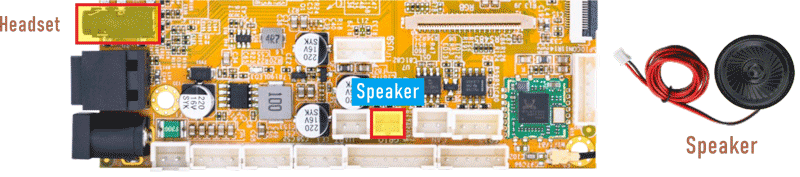
❶ Plug the headset into the 3.5mm audio jack.
❷ View sound card.
1cat /proc/asound/cards
❸ Recording.
1arecord -Dhw:0,0 -f cd record.wav //record via headset
❹ Play audio.
Audio output priority: Headset > HDMI > Speaker.
1aplay -Dhw:0,0 record.wav   //output via headset or speaker
2aplay -Dhw:1,0 record.wav   //output via HDMI
6.7 RTC
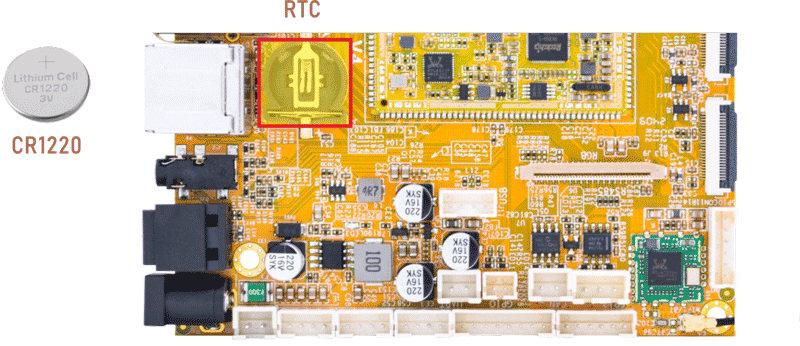
❶ Insert a CR1220 battery before test. It keeps the time running when the main power is off.
❷ Set date and time.
1date -s "2024-01-02 12:00:00"      //set system date
2hwclock -w                         //set the hardware clock to current system time
3hwclock
root@rk3568-buildroot:/# date -s "2024-01-02 12:00:00"
Tue Jan  2 12:00:00 UTC 2024
root@rk3568-buildroot:/# hwclock -w
root@rk3568-buildroot:/# hwclock
Tue Jan  2 12:00:12 2024  0.000000 seconds
root@rk3568-buildroot:/# hwclock
Tue Jan  2 12:01:17 2024  0.000000 seconds
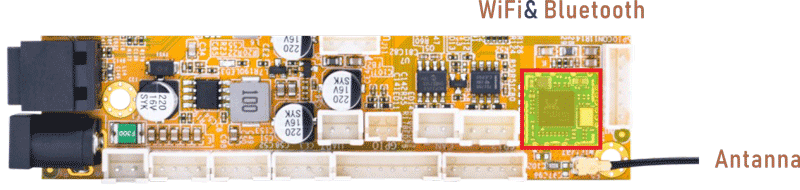
6.8 WiFi & Bluetooth
6.8.1 WiFi
❶ Connect the WiFi antenna.
❷ view the status of the network interfaces.
ifconfig
root@rk3568-buildroot:/# ifconfig
eth0      Link encap:Ethernet  HWaddr AA:3F:3C:A9:DA:66
          UP BROADCAST MULTICAST  MTU:1500  Metric:1
          RX packets:0 errors:0 dropped:0 overruns:0 frame:0
          TX packets:0 errors:0 dropped:0 overruns:0 carrier:0
          collisions:0 txqueuelen:1000
          RX bytes:0 (0.0 B)  TX bytes:0 (0.0 B)
          Interrupt:53

eth1      Link encap:Ethernet  HWaddr A6:3F:3C:A9:DA:66
          UP BROADCAST MULTICAST  MTU:1500  Metric:1
          RX packets:0 errors:0 dropped:0 overruns:0 frame:0
          TX packets:0 errors:0 dropped:0 overruns:0 carrier:0
          collisions:0 txqueuelen:1000
          RX bytes:0 (0.0 B)  TX bytes:0 (0.0 B)
         Interrupt:57

lo        Link encap:Local Loopback
          inet addr:127.0.0.1  Mask:255.0.0.0
          inet6 addr: ::1/128 Scope:Host
          UP LOOPBACK RUNNING  MTU:65536  Metric:1
          RX packets:0 errors:0 dropped:0 overruns:0 frame:0
          TX packets:0 errors:0 dropped:0 overruns:0 carrier:0
          collisions:0 txqueuelen:1000
          RX bytes:0 (0.0 B)  TX bytes:0 (0.0 B)

p2p0      Link encap:Ethernet  HWaddr 32:7B:C9:7A:A2:D8
          UP BROADCAST MULTICAST  MTU:1500  Metric:1
          RX packets:0 errors:0 dropped:0 overruns:0 frame:0
          TX packets:0 errors:0 dropped:0 overruns:0 carrier:0
          collisions:0 txqueuelen:1000
          RX bytes:0 (0.0 B)  TX bytes:0 (0.0 B)

wlan0     Link encap:Ethernet  HWaddr 30:7B:C9:7A:A2:D8
          UP BROADCAST MULTICAST  MTU:1500  Metric:1
          RX packets:0 errors:0 dropped:0 overruns:0 frame:0
          TX packets:0 errors:0 dropped:0 overruns:0 carrier:0
          collisions:0 txqueuelen:1000
          RX bytes:0 (0.0 B)  TX bytes:0 (0.0 B)
❸ Search hotspot.
1 iwlist wlan0 scan //scan the available APs
root@rk3568-buildroot:/# iwlist wlan0 scan
wlan0     Scan completed :
       Cell 01 - Address: 94:EC:13:1C:79:71
                 ESSID:"user-SSID"
                 Protocol:IEEE 802.11bgn
                 Mode:Master
                 Frequency:2.422 GHz (Channel 3)
                 Encryption key:on
                 Bit Rates:72 Mb/s
                 Extra:rsn_ie=30140100000fac040100000fac040100000fac020c00
                 IE: IEEE 802.11i/WPA2 Version 1
                     Group Cipher : CCMP
                     Pairwise Ciphers (1) : CCMP
                     Authentication Suites (1) : PSK
                 Quality=20/100  Signal level=36/100
                 Extra:fm=0003
       Cell 02 - Address: E2:5D:54:8E:58:86
                 ESSID:"EZVIZ_BE4401587"
                 Protocol:IEEE 802.11bgn
                 Mode:Master
                 Frequency:2.437 GHz (Channel 6)
                 Encryption key:on
                 Bit Rates:300 Mb/s
                 Extra:wpa_ie=dd160050f20101000050f20401000050f20401000050f202
                 IE: WPA Version 1
                     Group Cipher : CCMP
                     Pairwise Ciphers (1) : CCMP
                     Authentication Suites (1) : PSK
                 Extra:
                 IE: IEEE 802.11i/WPA2 Version 1
                     Group Cipher : CCMP
                     Pairwise Ciphers (1) : CCMP
                     Authentication Suites (1) : PSK
                 Quality=100/100  Signal level=12/100
                 Extra:fm=0002
     …
❹ Configure the wireless hotspot to be connected.
1vi /data/cfg/wpa_supplicant.conf //modify the SSID and password.
root@rk3568-buildroot:/# vi /data/cfg/wpa_supplicant.conf

ctrl_interface=/var/run/wpa_supplicant
ap_scan=1
update_config=1

network={
        ssid="input your SSID"
        psk="input your password"
        key_mgmt=WPA-PSK
}
~
~
~
After configuration is complete, press Esc, type :wq, press Enter
❺ Connect to hotspot.
1wpa_supplicant -B -i wlan0 -c /data/cfg/wpa_supplicant.conf
❻ Wait for 5-10 seconds, then execute the following commands to test network.
1ifconfig                           //view the network interface status
2ping -I wlan0 www.boardcon.com     //ping URL to test wifi
6.8.2 Bluetooth
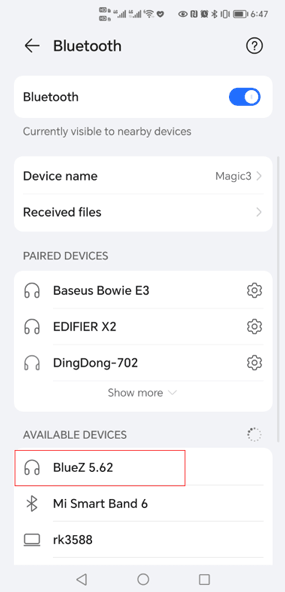
EM3568 BT named BlueZ 5.62
❶ Enable Bluetooth.
1bt_load_rtk_firmware
❷ View Bluetooth status.
1hciconfig -a
❸ Make Bluetooth discoverable and allow Bluetooth to be pairable.
1hciconfig hci0 piscan
2bluetoothctl
root@rk3568-buildroot:/# hciconfig hci0 piscan
root@rk3568-buildroot:/# bluetoothctl
Agent registered
[CHG] Controller 30:7B:C9:7A:A2:D9 Pairable: yes
❹ Connect to the Bluetooth device.
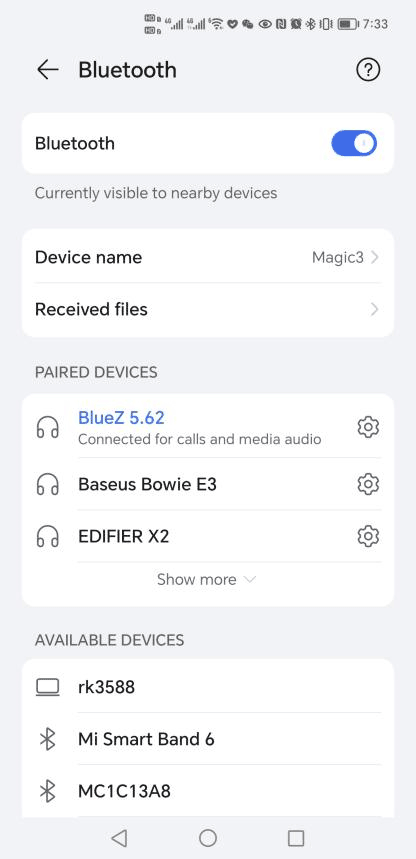
In the list of available Bluetooth devices on your phone, click BlueZ 5.62 to pair.
Type yes in the terminal.
[NEW] Device E0:80:6B:13:8E:99 a
[a]# [  924.852302] rtk_btcoex: io capability request
Request confirmation
[agent] Confirm passkey 548995 (yes/no): yes
[a]# [  932.721293] rtk_btcoex: link key notify
Connection successful.
❺ Exit bluetooth.
1 exit
6.9 Camera
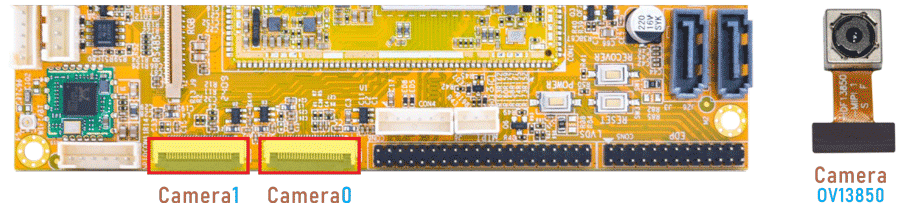
The EM3568 buildroot OS is configured with two cameras (OV13850) by default. If you need to preview the cameras normally, please connect two cameras.
❶ Connect camera0 and camera1.
❷ Power on.
❸ Check whether there are threads in rkaiq_3A_server
1pidof rkaiq_3A_server
The pidof command outputs the PID of the process, indicating that the rkaiq_3A_server has been started.
root@rk3568-buildroot:/# pidof rkaiq_3A_server
588
If there are no threads, execute the command to start rkaiq_3A_server.
1 /etc/init.d/S40rkaiq_3A start
❹ View the device channel.
1grep "" /sys/class/video4linux/v*/name | grep mainpath
2grep "" /sys/class/video4linux/v*/name | grep selfpath
root@rk3568-buildroot:/# grep "" /sys/class/video4linux/v*/name | grep mainpath
/sys/class/video4linux/video17/name:rkisp_mainpath
/sys/class/video4linux/video8/name:rkisp_mainpath
root@rk3568-buildroot:/# grep "" /sys/class/video4linux/v*/name | grep selfpath
/sys/class/video4linux/video18/name:rkisp_selfpath
/sys/class/video4linux/video9/name:rkisp_selfpath
❺ Preview/ Record/ Take photo
1gst-launch-1.0 v4l2src device=/dev/video8 ! video/x-raw,format=NV16,width=1280,height=800, framerate=30/1 ! kmssink
2gst-launch-1.0 v4l2src device=/dev/video17 ! video/x-raw,format=NV16,width=1280,height=800, framerate=30/1 ! kmssink
1gst-launch-1.0 v4l2src device=/dev/video8 num-buffers=100 ! video/x-raw,format=NV12,width=1920,height=1088,framerate=30/1 ! videoconvert ! mpph264enc ! h264parse ! mp4mux ! filesink location=/tmp/h264.mp4
1gst-launch-1.0 -v v4l2src device=/dev/video17 num-buffers=10 ! video/x-raw,format=NV12,width=1280,height=800 ! mppjpegenc ! multifilesink location=/tmp/test%05d.jpg
6.10 CAN
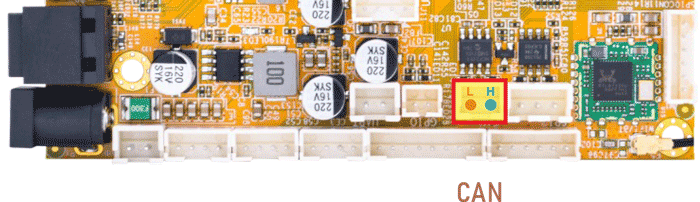
❶ Connect the CAN ports of Board A and B with the test line.
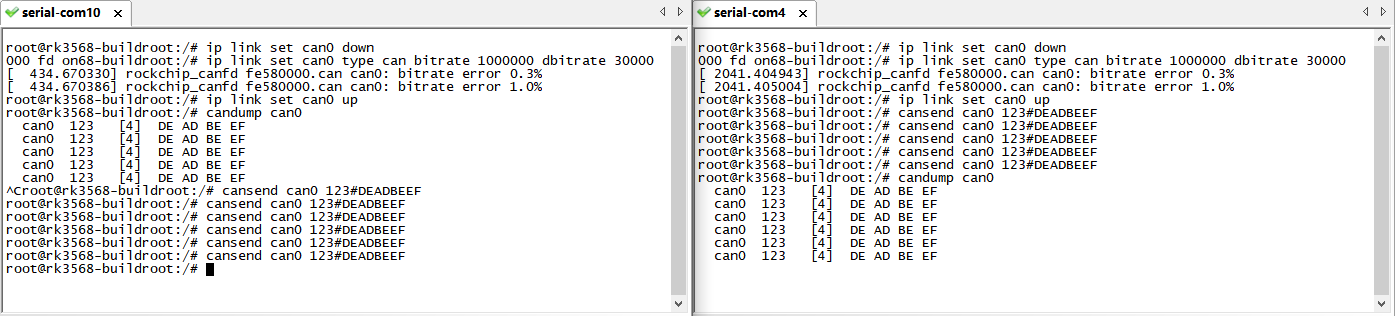
❷ execute the commands on the serial terminal of board A and board B respectively.
1ip link set can0 down
2ip link set can0 type can bitrate 1000000 dbitrate 3000000 fd on
3ip link set can0 up
❸ Set one development board as receiver.
1candump can0 //set to receiver
❹ The other board send characters as transmitter.
cansend can0 123#DEADBEEF //CAN0 send characters 0xDE 0xAD 0xBE 0xEF
6.11 RS485
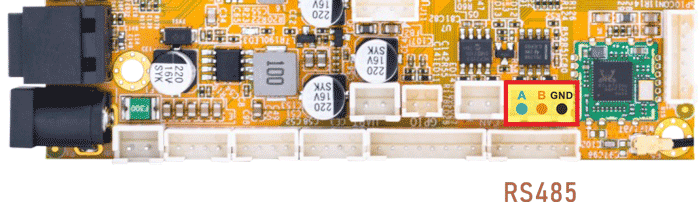
❶ Connect PC and board with USB-to-RS485 adapter.
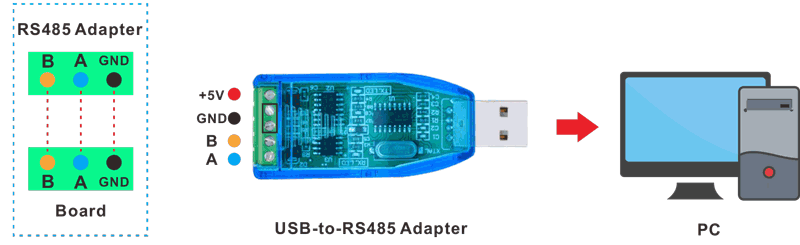
RS485 connection
❷ Open the Serial Terminal and set baud rate for the board and RS485 adapter respectively.
Baud rate: EM3568 - 1500000; RS485 adapter - 115200
❸ Execute command on the terminal serial port of board.
1com /dev/ttyS0 115200 8 0 1
com is a test file located at /usr/bin/
❹ Input character to test RS485 communication
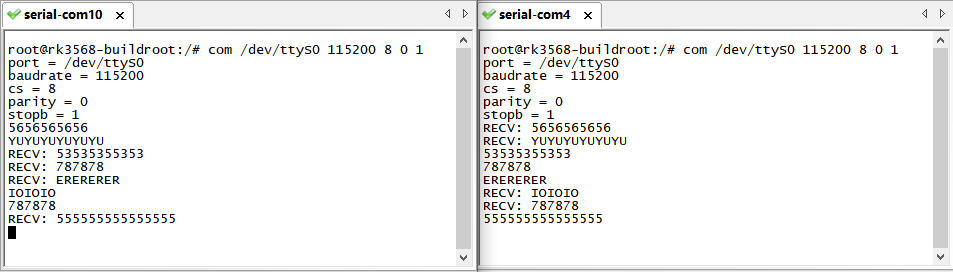
6.12 UART
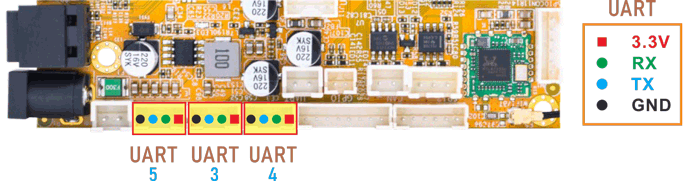
❶ Connect the transmit (TX) signal to the receive (RX) signal of UART.
❷ Execute the command and input characters to test.
1com /dev/ttyS3 115200 8 0 1 //test UART3
root@rk3568-buildroot:/# com /dev/ttyS3 115200 8 0 1
port = /dev/ttyS3
baudrate = 115200
cs = 8
parity = 0
stopb = 1
123456abc
RECV: 123456abc
❸ Press Ctrl + C to exit UART3 testing.
Execute command to test UART4 or UART5.
com /dev/ttyS4 115200 8 0 1      //test UART3
com /dev/ttyS5 115200 8 0 1      //test UART5
6.13 SATA
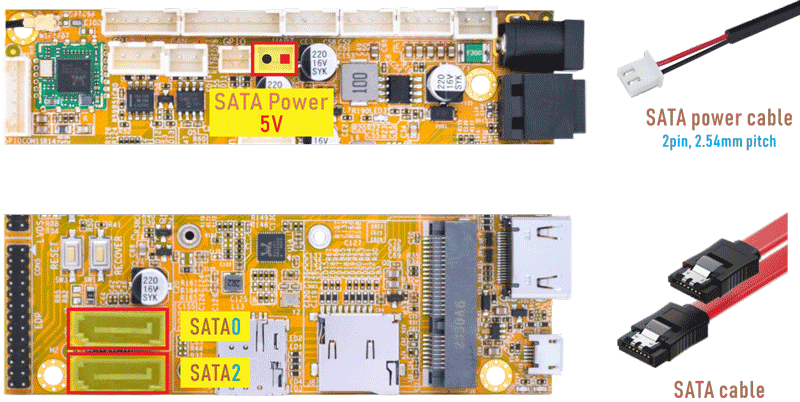
❶ Connect the SATA0 (6Gb/s) or SATA2 (3Gb/s) and the SATA power.
❷ Power on.
❸ Format the SATA device to ext4.
EM3568 buildroot OS only supports ext4 format. If the SATA device is in ext4 format, skip this step.
1ls /dev/                       //view the device name
2mke2fs -t ext4 /dev/sda1       //format SATA to ext4
❹ Mount SATA and test.
1mkdir /mnt/sata0               //create a Mount Point
2mount /dev/sda1 /mnt/sata0     //mount SATA
3ls /mnt/sata0                 //view the contents of SATA
4df -h                         //view the space size of the mounted disk
root@rk3568-buildroot:/# mkdir /mnt/sata0
root@rk3568-buildroot:/# mount /dev/sda1 /mnt/sata0
[   68.841071] FAT-fs (sda1): utf8 is not a recommended IO charset for FAT filesystems, filesystem will be case sensitive!
[   68.843270] FAT-fs (sda1): Volume was not properly unmounted. Some data may be corrupt. Please run fsck.
root@rk3568-buildroot:/# ls /mnt/sata0
Alarms      Documents    Movies         Podcasts    test
Android     Download     Music          Recordings  test.wav
Audiobooks  Go-home.mp3  Notifications  Ringtones   testsata
DCIM        LOST.DIR     Pictures       sata
root@rk3568-buildroot:/# df -h
Filesystem      Size  Used Avail Use% Mounted on
/dev/root       5.9G  680M  5.0G  12% /
devtmpfs        970M  8.0K  970M   1% /dev
tmpfs           981M  132K  981M   1% /tmp
tmpfs           981M  456K  981M   1% /run
tmpfs           981M     0  981M   0% /dev/shm
/dev/mmcblk0p7  121M   12M  103M  11% /oem
/dev/mmcblk0p8  911M  328K  848M   1% /userdata
/dev/sda1       112G  8.3M  112G   1% /mnt/sata0
6.14 4G&GPS
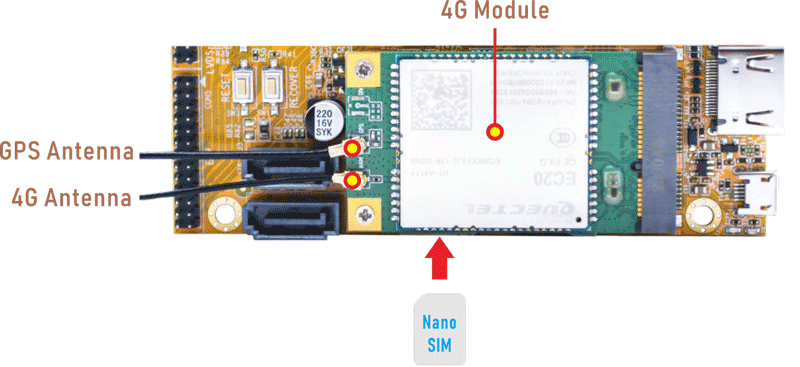
6.14.1 4G
❶ Insert 4G module to mPCIe slot (4G model: EC20/EC25).
❷ Connect antenna and insert SIM card.
❸ Power on.
❹ Realize ppp dialing.
1pppd call quectel-ppp &
❺ View network interface status.
1ifconfig
root@rk3568-buildroot:/# ifconfig
eth0      Link encap:Ethernet  HWaddr 5E:42:CA:03:D9:2E
       UP BROADCAST MULTICAST  MTU:1500  Metric:1
       RX packets:0 errors:0 dropped:0 overruns:0 frame:0
       TX packets:0 errors:0 dropped:0 overruns:0 carrier:0
       collisions:0 txqueuelen:1000
       RX bytes:0 (0.0 B)  TX bytes:0 (0.0 B)
       Interrupt:53

eth1      Link encap:Ethernet  HWaddr 5A:42:CA:03:D9:2E
       UP BROADCAST MULTICAST  MTU:1500  Metric:1
       RX packets:0 errors:0 dropped:0 overruns:0 frame:0
       TX packets:0 errors:0 dropped:0 overruns:0 carrier:0
       collisions:0 txqueuelen:1000
       RX bytes:0 (0.0 B)  TX bytes:0 (0.0 B)
       Interrupt:57

lo        Link encap:Local Loopback
       inet addr:127.0.0.1  Mask:255.0.0.0
       inet6 addr: ::1/128 Scope:Host
       UP LOOPBACK RUNNING  MTU:65536  Metric:1
       RX packets:0 errors:0 dropped:0 overruns:0 frame:0
       TX packets:0 errors:0 dropped:0 overruns:0 carrier:0
       collisions:0 txqueuelen:1000
       RX bytes:0 (0.0 B)  TX bytes:0 (0.0 B)

p2p0      Link encap:Ethernet  HWaddr B6:6D:C2:58:2E:40
       UP BROADCAST MULTICAST  MTU:1500  Metric:1
       RX packets:0 errors:0 dropped:0 overruns:0 frame:0
       TX packets:0 errors:0 dropped:0 overruns:0 carrier:0
       collisions:0 txqueuelen:1000
       RX bytes:0 (0.0 B)  TX bytes:0 (0.0 B)

ppp0      Link encap:Point-to-Point Protocol
       inet addr:10.32.82.160  P-t-P:10.64.64.64  Mask:255.255.255.255
       UP POINTOPOINT RUNNING NOARP MULTICAST  MTU:1500  Metric:1
       RX packets:27 errors:0 dropped:0 overruns:0 frame:0
       TX packets:28 errors:0 dropped:0 overruns:0 carrier:0
       collisions:0 txqueuelen:3
       RX bytes:2205 (2.1 KiB)  TX bytes:1754 (1.7 KiB)

wlan0     Link encap:Ethernet  HWaddr B4:6D:C2:58:2E:40
       UP BROADCAST MULTICAST  MTU:1500  Metric:1
       RX packets:0 errors:0 dropped:0 overruns:0 frame:0
       TX packets:0 errors:0 dropped:0 overruns:0 carrier:0
       collisions:0 txqueuelen:1000
       RX bytes:0 (0.0 B)  TX bytes:0 (0.0 B)
❻ Ping URL/IP to check the network connectivity.
1ping -I ppp0 www.boardcon.com
6.14.2 GPS
❶ Plug the EC20 module to mPCIe socket.
❷ Connect GPS antenna.
❸ Power on.
❹ Execute commands to test GPS.
echo -e "AT+QGPS=1\r\n" > /dev/ttyUSB2      //test GPS
cat /dev/ttyUSB1
root@rk3568-buildroot:/# echo -e "AT+QGPS=1\r\n" > /dev/ttyUSB2
root@rk3568-buildroot:/# cat /dev/ttyUSB1
$GPVTG,,T,,M,,N,,K,N*2C

$GPGSA,A,1,,,,,,,,,,,,,,,,*1E

$GPGGA,,,,,,0,,,,,,,,*66

$GPRMC,,V,,,,,,,,,,N*53

$GPVTG,,T,,M,,N,,K,N*2C

$GPGSA,A,1,,,,,,,,,,,,,,,,*1E

$GPGGA,,,,,,0,,,,,,,,*66

$GPRMC,,V,,,,,,,,,,N*53
6.15 SPI
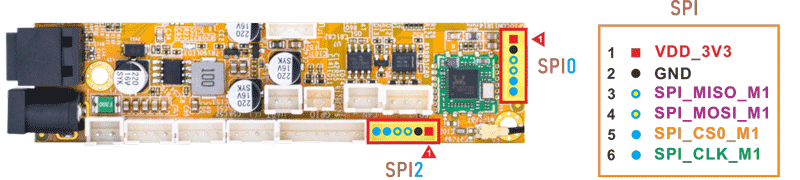
❶ Connect MISO_M1 and MOSI_M1 of SPI.
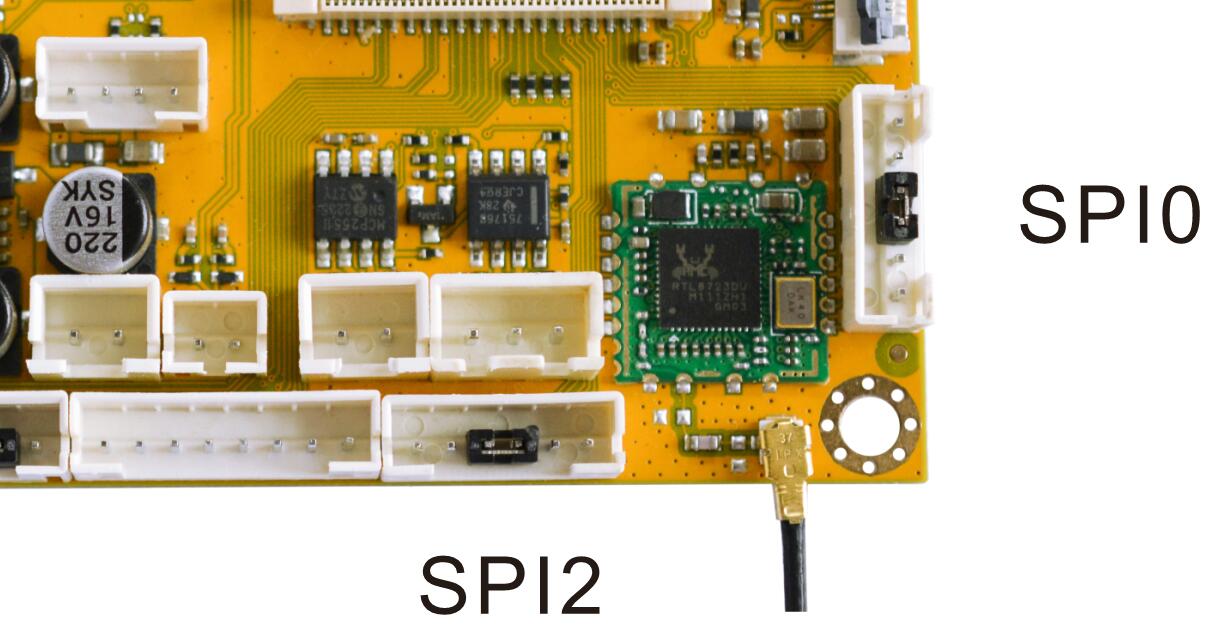
❷ Test SPI.
1spidev0.0_test          //test SPI0
2spidev2.0_test          //test SPI2
root@rk3568-buildroot:/# spidev0.0_test
spi mode: 0
bits per word: 8
max speed: 500000 Hz (500 KHz)

FF FF FF FF FF FF
40 00 00 00 00 95
FF FF FF FF FF FF
FF FF FF FF FF FF
FF FF FF FF FF FF
DE AD BE EF BA AD
F0 0D
root@rk3568-buildroot:/# spidev2.0_test
spi mode: 0
bits per word: 8
max speed: 500000 Hz (500 KHz)

FF FF FF FF FF FF
40 00 00 00 00 95
FF FF FF FF FF FF
FF FF FF FF FF FF
FF FF FF FF FF FF
DE AD BE EF BA AD
F0 0D
6.16 Keys
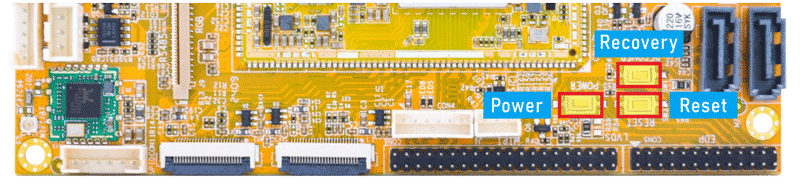
Recovery long press to enter loader mode.
Power short press to sleep/wake up, long press to shutdown/startup.
Reset restart the board.
6.17 video playback
6.17.1 Built-in playback
The script instruction directory is in /rockchip-test/video, just run it, as shown below.
root@rk3568-buildroot:/# ls /rockchip-test/video/
test_dec-gst.sh     test_enc-gst.sh         test_gst_video_maxfps.sh
test_dec-mpv.sh     test_gst_multivideo.sh  video_stresstest.sh
test_dec-parole.sh  test_gst_video.sh       video_test.sh
test_dec-qt.sh      test_gst_video_fps.sh
root@rk3568-buildroot:/# cd /rockchip-test/video/
root@linaro-alip:/rockchip-test/video#
root@rk3568-buildroot:/# ./test_gst_video.sh
6.17.2 Browser playback
1chromium /mnt/udisk/video/4KP30/4K30P-BLACKPINK-DDU-DU_DDDU-DU.mp4
Command explanation:
chromium Launches the Chromium browser.
/mnt/udisk/video/4KP30/4K30P-BLACKPINK-DDU-DU_DDDU-DU.mp4 The media file path to be played.
6.17.3 gst-play-1.0 playback
If some video files cannot be played normally by chromium browser, user can use gst-play-1.0 to play.
❶ Select the display for playback
1cat /sys/kernel/debug/dri/0/state | grep "plane\["
❷ open AFBC
1export GST_MPP_VIDEODEC_DEFAULT_ARM_AFBC=1
❸ Select sound card 4, audio output via HDMI.
1GST_DEBUG=*mpp*:4 gst-play-1.0 --flags=3 --videosink="kmssink plane-id=129" /mnt/udisk/video/H265_HEVC/I.O.I-Dream.Girl.2160p.UHDTV.H265.ts --audiosink="alsasink device=hw:1,0"