6. Debian Application
6.1 Display
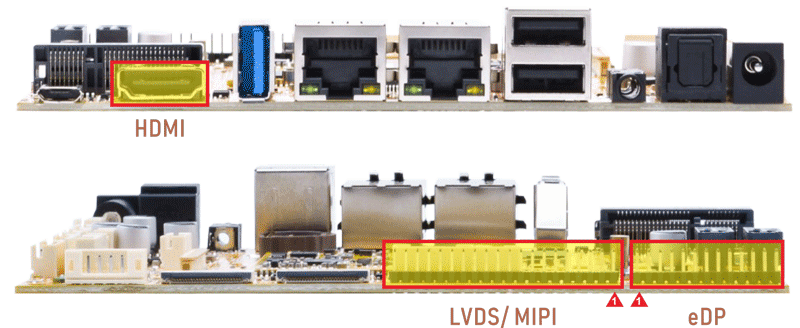
EM3568 supports HDMI/LVDS dual-display.
If want to make the touch screen available when run the HDMI and LVDS simultaneously, please bind the TP to LVDS as follow.
❶ install xinput and list monitors.
1apt-get update
2apt-get install xinput
3xrandr
root@linaro-alip:/# xrandr
Screen 0: minimum 320 x 200, current 5120 x 2160, maximum 16384 x 16384
LVDS-1 connected primary 1280x800+0+0 (normal left inverted right x axis y axis) 0mm x 0mm
   1280x800      59.19*+
HDMI-1 connected 3840x2160+1280+0 (normal left inverted right x axis y axis) 0mm x 0mm
   3840x2160     30.00*+  30.00    25.00    24.00    29.97    23.98
   1920x2160     59.99
   2560x1440     59.95
   1920x1080     60.00    60.00    50.00    59.94
   1920x1080i    60.00    50.00    59.94
   1680x1050     59.88
   1280x1024     75.02    60.02
   1440x900      59.90
   1280x960      60.00
   1280x720      60.00    60.00    50.00    59.94
   1024x768      75.03    70.07    60.00
   832x624       74.55
   800x600       72.19    75.00    60.32    56.25
   720x576       50.00    50.00    50.00
   720x480       60.00    60.00    59.94    59.94    59.94
   640x480       75.00    72.81    66.67    60.00    59.94    59.94
   720x400       70.08
❷ view the input device ID
1xinput
root@linaro-alip:/# xinput
        Virtual core pointer                        id=2    [master pointer  (3)]
             Virtual core XTEST pointer                    id=4    [slave  pointer  (2)]
             INSTANT USB GAMING MOUSE                      id=7    [slave  pointer  (2)]
             INSTANT USB GAMING MOUSE  Consumer Control    id=10   [slave  pointer  (2)]
             goodix-ts                                     id=14   [slave  pointer  (2)]
        Virtual core keyboard                       id=3    [master keyboard (2)]
             Virtual core XTEST keyboard                     id=5    [slave  keyboard (3)]
             adc-keys                                        id=6    [slave  keyboard (3)]
             INSTANT USB GAMING MOUSE  System Control        id=8    [slave  keyboard (3)]
             INSTANT USB GAMING MOUSE  Keyboard              id=9    [slave  keyboard (3)]
             rk805 pwrkey                                    id=11   [slave  keyboard (3)]
             fdd70030.pwm                                    id=12   [slave  keyboard (3)]
             hdmi_cec_key                                    id=13   [slave  keyboard (3)]
             INSTANT USB GAMING MOUSE  Consumer Control      id=15   [slave  keyboard (3)]
❸ bind TP.
Command: xinput map-to-output [ID] [display name]
xinput map-to-output 14 LVDS-1
If only HDMI display is required, user can turn off the LVDS.
1echo off > /sys/class/drm/card0-LVDS-1/status
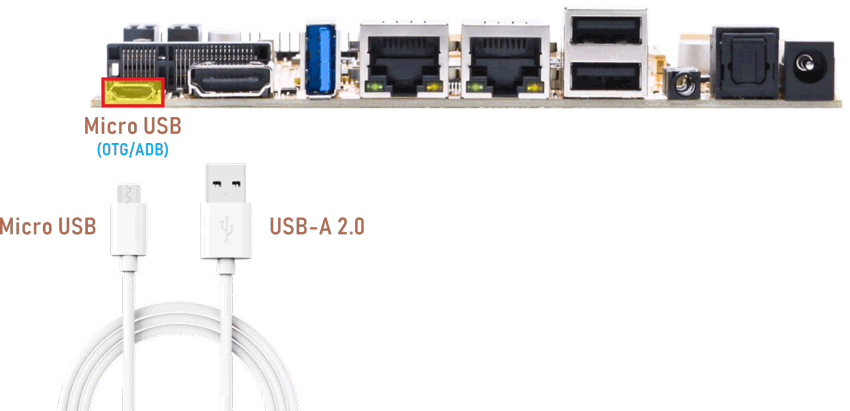
6.2 ADB
The micro USB is mainly used for firmware upgrades and ADB function.
ADB is the command-line debugging tool. It can use for system logs, uploading and downloading the files, installing the applications, etc.
❶ connect the board and PC host with Micro USB cable.
❷ install ADB driver on Windows system.
❸ press Windows + R to open the Run program. Type cmd and press Enter
❹ execute the command to enable ADB.
1adb shell
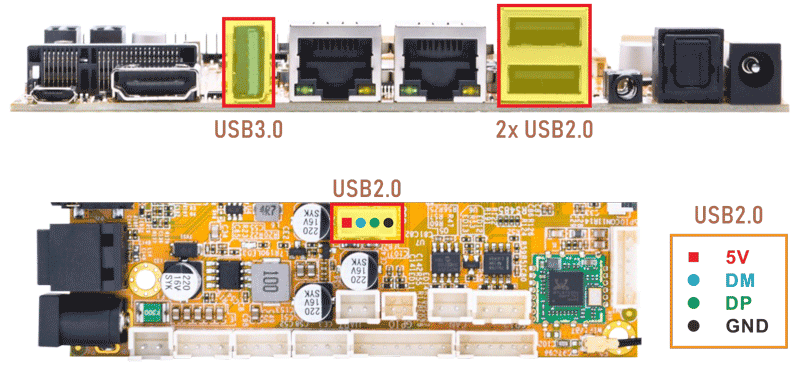
6.3 USB Host
After insert the U-Disk, the device icon will be formed on the desktop.
Two ways to mount the device:
#1 double-click the device icon on the desktop.
#2 double-click Home icon to enter the main directory, then click Devices to mount.
The USB3.0 default support Superspeed.
root@linaro-alip:/
# [  413.812865] usb 6-1: new SuperSpeed Gen 1 USB device number 2 using xhci-hcd
[  413.831657] usb 6-1: New USB device found, idVendor=3535, idProduct=6300, bcdDevice= 1.10
[  413.831736] usb 6-1: New USB device strings: Mfr=1, Product=2, SerialNumber=3
[  413.831764] usb 6-1: Product: U330
[  413.831789] usb 6-1: Manufacturer: aigo
[  413.831811] usb 6-1: SerialNumber: 52A7B285B4956ADF
[  413.834783] usb-storage 6-1:1.0: USB Mass Storage device detected
[  413.836755] scsi host3: usb-storage 6-1:1.0
[  413.838251] pwm-backlight backlight1: supply power not found, using dummy regulator
[  413.840938] pwm-backlight backlight1: supply power not found, using dummy regulator
[  414.854335] scsi 3:0:0:0: Direct-Access     aigo     U330             PMAP PQ: 0 ANSI: 6
[  414.857811] sd 3:0:0:0: [sdb] 122880000 512-byte logical blocks: (62.9 GB/58.6 GiB)
[  414.858791] sd 3:0:0:0: [sdb] Write Protect is off
[  414.859962] sd 3:0:0:0: [sdb] Write cache: disabled, read cache: enabled, doesn't support DPO or FUA
[  415.045021]  sdb: sdb1
[  415.051240] sd 3:0:0:0: [sdb] Attached SCSI removable disk
[  415.052500] pwm-backlight backlight1: supply power not found, using dummy regulator
6.4 SD Card
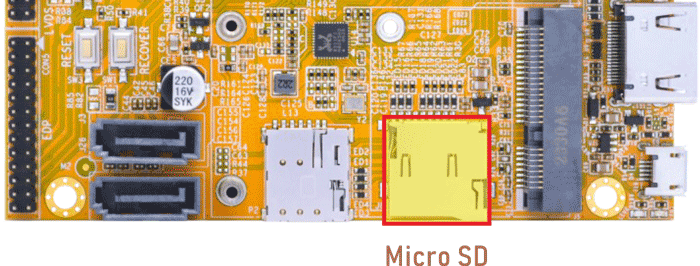
After inserting the SD Card, an icon will appear on the desktop. Click the icon to automatically mount the device.
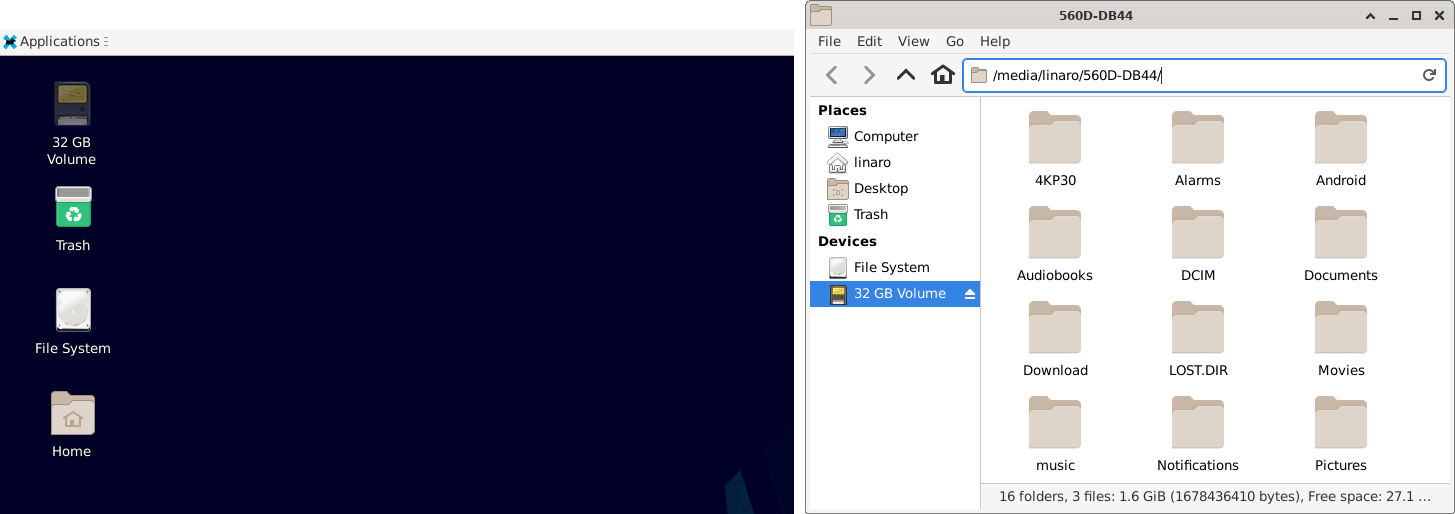
Mounted SD card
6.5 Ethernet
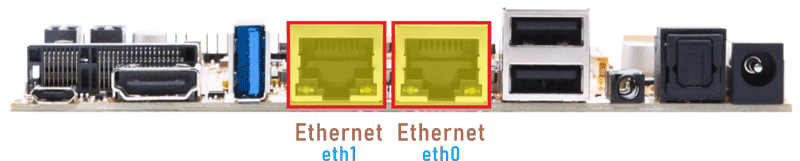
❶ Connect the board and router with the Ethernet cable.
❷ Check the network interface status.
ifconfig
root@linaro-alip:/# ifconfig
eth0: flags=4163<UP,BROADCAST,RUNNING,MULTICAST>  mtu 1500
        inet 192.168.0.177  netmask 255.255.255.0  broadcast 192.168.0.255
        inet6 fe80::153c:89c7:2010:7744  prefixlen 64  scopeid 0x20<link>
        ether 56:a3:ac:16:61:25  txqueuelen 1000  (Ethernet)
        RX packets 691  bytes 81627 (79.7 KiB)
        RX errors 0  dropped 28  overruns 0  frame 0
        TX packets 137  bytes 12576 (12.2 KiB)
        TX errors 0  dropped 0 overruns 0  carrier 0  collisions 0
        device interrupt 53

eth1: flags=4163<UP,BROADCAST,RUNNING,MULTICAST>  mtu 1500
        inet 192.168.0.131  netmask 255.255.255.0  broadcast 192.168.0.255
        inet6 fe80::f989:7096:d99a:4fe7  prefixlen 64  scopeid 0x20<link>
        ether 52:a3:ac:16:61:25  txqueuelen 1000  (Ethernet)
        RX packets 104  bytes 17523 (17.1 KiB)
        RX errors 0  dropped 3  overruns 0  frame 0
        TX packets 58  bytes 7112 (6.9 KiB)
        TX errors 0  dropped 0 overruns 0  carrier 0  collisions 0
        device interrupt 57

lo: flags=73<UP,LOOPBACK,RUNNING>  mtu 65536
        inet 127.0.0.1  netmask 255.0.0.0
        inet6 ::1  prefixlen 128  scopeid 0x10<host>
        loop  txqueuelen 1000  (Local Loopback)
        RX packets 9  bytes 1008 (1008.0 B)
        RX errors 0  dropped 0  overruns 0  frame 0
        TX packets 9  bytes 1008 (1008.0 B)
        TX errors 0  dropped 0 overruns 0  carrier 0  collisions 0

wlx307bc97aa2d8: flags=4099<UP,BROADCAST,MULTICAST>  mtu 1500
        ether 30:7b:c9:7a:a2:d8  txqueuelen 1000  (Ethernet)
        RX packets 0  bytes 0 (0.0 B)
        RX errors 0  dropped 0  overruns 0  frame 0
        TX packets 0  bytes 0 (0.0 B)
        TX errors 0  dropped 0 overruns 0  carrier 0  collisions 0

wlx327bc97aa2d8: flags=4099<UP,BROADCAST,MULTICAST>  mtu 1500
        ether 32:7b:c9:7a:a2:d8  txqueuelen 1000  (Ethernet)
        RX packets 0  bytes 0 (0.0 B)
        RX errors 0  dropped 0  overruns 0  frame 0
        TX packets 0  bytes 0 (0.0 B)
        TX errors 0  dropped 0 overruns 0  carrier 0  collisions 0
❸ Use the ping command to test the network.
ping -I eth0 www.boardcon.com       //test eth0
ping -I eth1 www.boardcon.com       //test eth1
root@linaro-alip:/# ping -I eth0 www.boardcon.com
PING www.boardcon.com (67.222.54.196) from 192.168.0.177 eth0: 56(84) bytes of data.
64 bytes from 67-222-54-196.unifiedlayer.com (67.222.54.196): icmp_seq=1 ttl=48 time=188 ms
64 bytes from 67-222-54-196.unifiedlayer.com (67.222.54.196): icmp_seq=2 ttl=48 time=187 ms
64 bytes from 67-222-54-196.unifiedlayer.com (67.222.54.196): icmp_seq=3 ttl=48 time=188 ms
64 bytes from 67-222-54-196.unifiedlayer.com (67.222.54.196): icmp_seq=4 ttl=48 time=187 ms
^C
--- www.boardcon.com ping statistics ---
4 packets transmitted, 4 received, 0% packet loss, time 3004ms
rtt min/avg/max/mdev = 187.303/187.503/187.660/0.142 ms
root@linaro-alip:/# ping -I eth1 www.boardcon.com
PING www.boardcon.com (67.222.54.196) from 192.168.0.131 eth1: 56(84) bytes of data.
64 bytes from 67-222-54-196.unifiedlayer.com (67.222.54.196): icmp_seq=1 ttl=48 time=189 ms
64 bytes from 67-222-54-196.unifiedlayer.com (67.222.54.196): icmp_seq=3 ttl=48 time=188 ms
64 bytes from 67-222-54-196.unifiedlayer.com (67.222.54.196): icmp_seq=2 ttl=48 time=187 ms
64 bytes from 67-222-54-196.unifiedlayer.com (67.222.54.196): icmp_seq=3 ttl=48 time=188 ms
^C
--- www.boardcon.com ping statistics ---
4 packets transmitted, 4 received, 0% packet loss, time 3003ms
rtt min/avg/max/mdev = 187.495/188.111/189.302/0.841 ms
6.6 Audio I/O
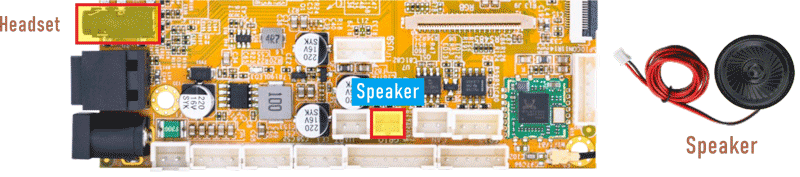
❶ Plug the headset into the 3.5mm audio jack.
❷ View sound card.
1cat /proc/asound/cards
❸ Recording.
1arecord -Dhw:0,0 -f cd record.wav
❹ Play audio.
Audio output priority: Headset > HDMI > Speaker.
1aplay -Dhw:0,0 record.wav   //output via headset or speaker
2aplay -Dhw:1,0 record.wav   //output via HDMI
6.7 RTC
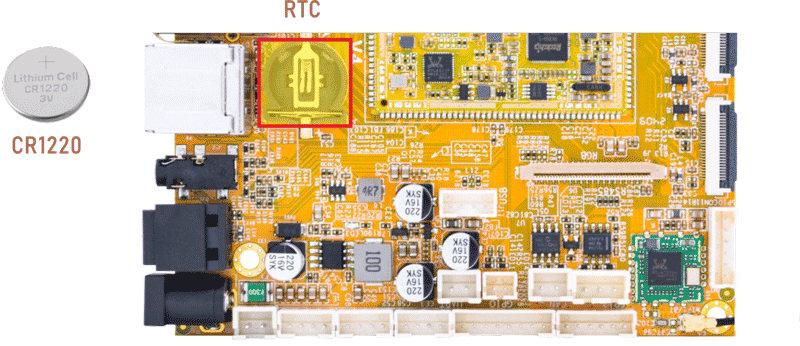
❶ Insert a CR1220 battery before test. It keeps the time running when the main power is off.
❷ Set date and time.
date -s “2023-07-21 15:36:00”   //set system date
hwclock -w                     //set the hardware clock to current system time
hwclock
root@linaro-alip:/# date -s "2023-07-21 15:36:00"
Fri Jul 21 15:36:00 UTC 2023
root@linaro-alip:/# hwclock -w
root@linaro-alip:/# hwclock
2023-07-21 15:36:11.784862+00:00
root@linaro-alip:/# hwclock
2023-07-21 15:36:28.961459+00:00
6.8 WiFi & Bluetooth
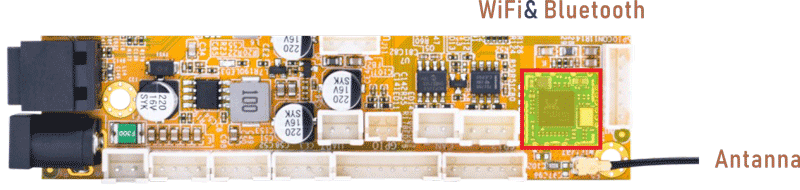
6.8.1 WiFi
❶ Connect the WiFi antenna.
❷ Click the network icon in the top right corner of the UI interface, select the SSID from the list of available networks and enter the password.
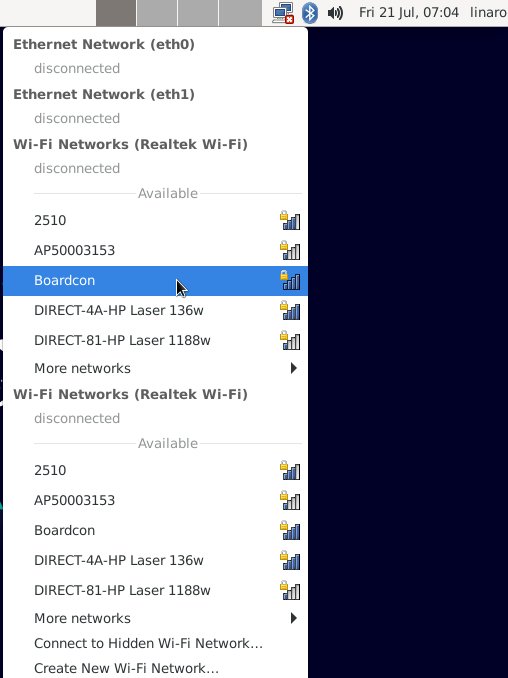
SSID list
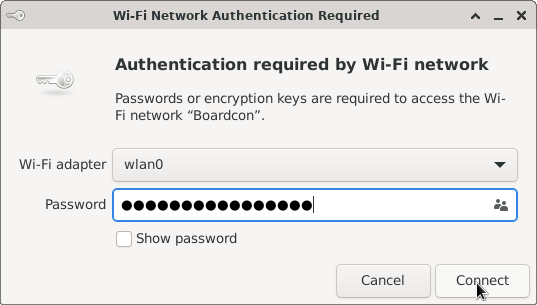
Enter password
WiFi connected
❸ View network status.
1ifconfig
root@linaro-alip:/# ifconfig
eth0: flags=4099<UP,BROADCAST,MULTICAST>  mtu 1500
        ether 5e:42:ca:03:d9:2e  txqueuelen 1000  (Ethernet)
        RX packets 0  bytes 0 (0.0 B)
        RX errors 0  dropped 0  overruns 0  frame 0
        TX packets 0  bytes 0 (0.0 B)
        TX errors 0  dropped 0 overruns 0  carrier 0  collisions 0
        device interrupt 53

eth1: flags=4099<UP,BROADCAST,MULTICAST>  mtu 1500
        ether 5a:42:ca:03:d9:2e  txqueuelen 1000  (Ethernet)
        RX packets 0  bytes 0 (0.0 B)
        RX errors 0  dropped 0  overruns 0  frame 0
        TX packets 0  bytes 0 (0.0 B)
        TX errors 0  dropped 0 overruns 0  carrier 0  collisions 0
        device interrupt 57

lo: flags=73<UP,LOOPBACK,RUNNING>  mtu 65536
        inet 127.0.0.1  netmask 255.0.0.0
        inet6 ::1  prefixlen 128  scopeid 0x10<host>
        loop  txqueuelen 1000  (Local Loopback)
        RX packets 0  bytes 0 (0.0 B)
        RX errors 0  dropped 0  overruns 0  frame 0
        TX packets 0  bytes 0 (0.0 B)
        TX errors 0  dropped 0 overruns 0  carrier 0  collisions 0

wlxb46dc2582e40: flags=4099<UP,BROADCAST,MULTICAST>  mtu 1500
        ether b4:6d:c2:58:2e:40  txqueuelen 1000  (Ethernet)
        RX packets 0  bytes 55640 (54.3 KiB)
        RX errors 0  dropped 44  overruns 0  frame 0
        TX packets 0  bytes 16978 (16.5 KiB)
        TX errors 0  dropped 0 overruns 0  carrier 0  collisions 0

wlxb66dc2582e40: flags=4163<UP,BROADCAST,RUNNING,MULTICAST>  mtu 1500
        inet 192.168.0.142  netmask 255.255.255.0  broadcast 192.168.0.255
        inet6 fe80::9364:27ce:9076:4d9a  prefixlen 64  scopeid 0x20<link>
        ether b6:6d:c2:58:2e:40  txqueuelen 1000  (Ethernet)
        RX packets 155  bytes 20192 (19.7 KiB)
        RX errors 0  dropped 18  overruns 0  frame 0
        TX packets 72  bytes 8862 (8.6 KiB)
        TX errors 0  dropped 0 overruns 0  carrier 0  collisions 0
❹ Ping URL to test WiFi.
1ping -I wlxb66dc2582e40 www.boardcon.com
6.8.2 Bluetooth
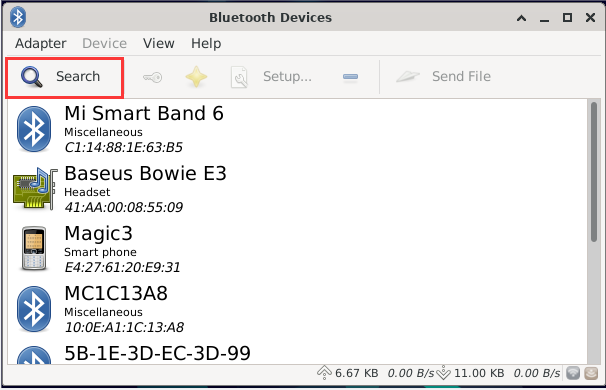
❶ Click the Bluetooth icon in the top right corner of the UI interface, select Devices…
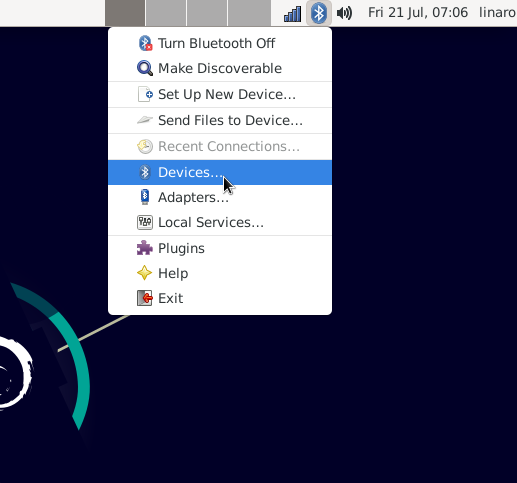
❷ The Bluetooth device name is hidden by default. Set the Bluetooth device name to be visible. Click Adapter -> Preferencs -> Always visible
❸ Click Search and select the available device in the list to pair.
6.9 Camera
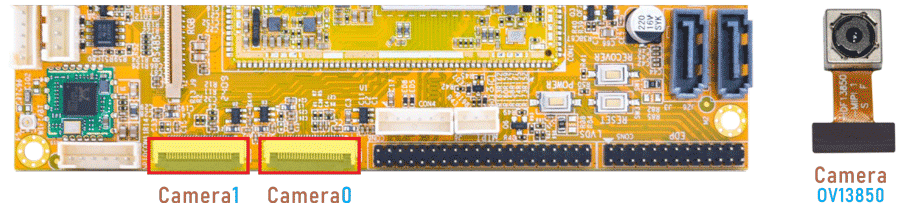
The EM3568 Debian11 OS is configured with two cameras (ov13850) by default. If you need to preview the cameras normally, please connect two cameras.
❶ Connect camera0 and camera1.
❷ Power on.
❸ Check whether there are threads in rkaiq_3A_server
1pidof rkaiq_3A_server
The pidof command outputs the PID of the process, indicating that the rkaiq_3A_server has been started.
root@linaro-alip:/# pidof rkaiq_3A_server
235
If there are no threads, execute the command to start rkaiq_3A_server.
1 /etc/init.d/rkaiq_3A.sh start
❹ View the device channel.
1grep "" /sys/class/video4linux/v*/name | grep mainpath
2grep "" /sys/class/video4linux/v*/name | grep selfpath
root@linaro-alip:/# grep "" /sys/class/video4linux/v*/name | grep mainpath
/sys/class/video4linux/video17/name:rkisp_mainpath
/sys/class/video4linux/video8/name:rkisp_mainpath
root@linaro-alip:/# grep "" /sys/class/video4linux/v*/name | grep selfpath
/sys/class/video4linux/video18/name:rkisp_selfpath
/sys/class/video4linux/video9/name:rkisp_selfpath
❺ Preview/ Record/ Take photo
1gst-launch-1.0 v4l2src device=/dev/video8 ! video/x-raw,format=NV16,width=1280,height=800, framerate=30/1 ! kmssink
2gst-launch-1.0 v4l2src device=/dev/video17 ! video/x-raw,format=NV16,width=1280,height=800, framerate=30/1 ! kmssink
1gst-launch-1.0 v4l2src device=/dev/video8 num-buffers=100 ! video/x-raw,format=NV12,width=1920,height=1088,framerate=30/1 ! videoconvert ! mpph264enc ! h264parse ! mp4mux ! filesink location=/tmp/h264.mp4
1gst-launch-1.0 -v v4l2src device=/dev/video17 num-buffers=10 ! video/x-raw,format=NV12,width=1280,height=800 ! mppjpegenc ! multifilesink location=/tmp/test%05d.jpg
6.10 CAN
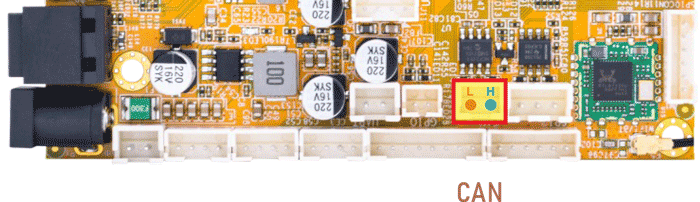
❶ Connect the CAN ports of Board A and B with the test line.
❷ execute the commands on the serial terminal of board A and board B respectively.
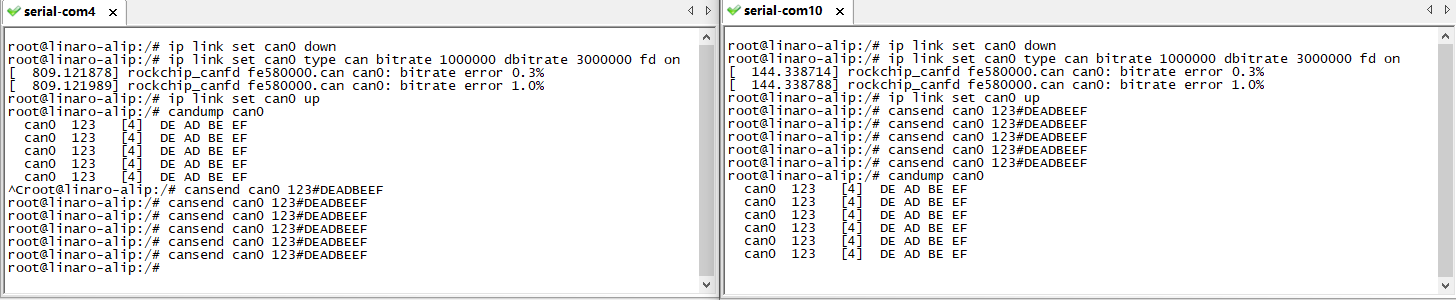
1ip link set can0 down
2ip link set can0 type can bitrate 1000000 dbitrate 3000000 fd on
3ip link set can0 up
❸ Set one development board as receiver.
1candump can0 //set to receiver
❹ The other board send characters as transmitter.
1cansend can0 123#DEADBEEF //CAN0 send characters 0xDE 0xAD 0xBE 0xEF
6.11 RS485
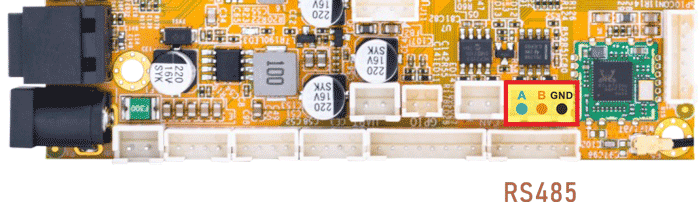
❶ Connect PC and board with USB-to-RS485 adapter.
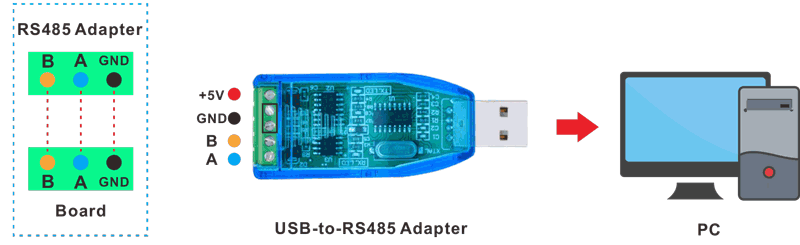
RS485 connection
❷ Open the Serial Terminal and set baud rate for the board and RS485 adapter respectively.
Baud rate: EM3568 - 1500000; RS485 adapter - 115200
❸ Execute command on the terminal serial port of board.
1com /dev/ttyS0 115200 8 0 1
com is a test file located at /usr/bin/
❹ Input character to test RS485 communication.

6.12 UART
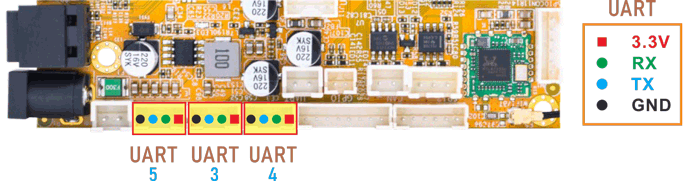
❶ Connect the transmit (TX) signal to the receive (RX) signal of UART.
❷ Execute the command and input characters to test.
1com /dev/ttyS3 115200 8 0 1 //test UART3
root@linaro-alip:/# com /dev/ttyS3 115200 8 0 1
port = /dev/ttyS3
baudrate = 115200
cs = 8
parity = 0
stopb = 1
aaaaaaaaaaa
RECV: aaaaaaaaaaa
❸ Press Ctrl + C to exit UART3 testing.
Execute command to test UART4 or UART5.
com /dev/ttyS4 115200 8 0 1      //test UART3
com /dev/ttyS5 115200 8 0 1      //test UART5
6.13 SATA
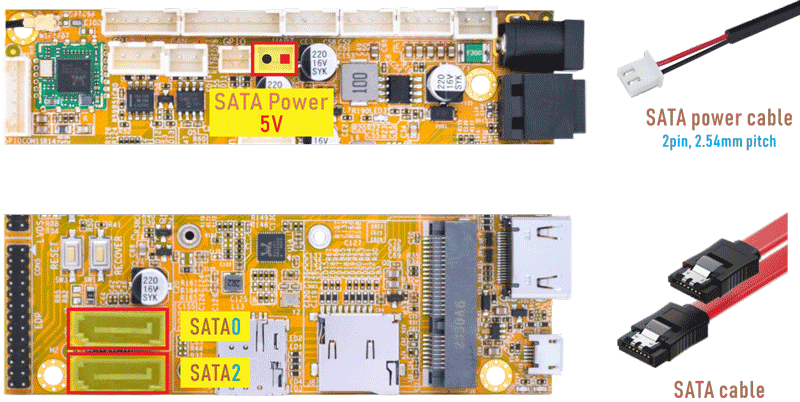
❶ Connect the SATA0 (6Gb/s) or SATA2 (3Gb/s) and the SATA power.
❷ Power on.
❸ Format the SATA device to ext4.
EM3568 debian OS only supports ext4 format. If the SATA device is in ext4 format, skip this step.
1ls /dev/                       //view the device name
2mke2fs -t ext4 /dev/sda1      //format SATA(sda1) to ext4
❹ Mount SATA and test.
1mkdir /mnt/sata              //create a Mount Point
2mount /dev/sda1 /mnt/sata    //mount SATA
3ls /mnt/sata                //view the contents of the sata
4df -h                       //view the space size of the mounted disk
root@linaro-alip:/# mkdir /mnt/sata
root@linaro-alip:/# mount /dev/sda1 /mnt/sata
[   65.779264] FAT-fs (sda1): utf8 is not a recommended IO charset for FAT filesystems, filesystem will be case sensitive!
[   65.782860] FAT-fs (sda1): Volume was not properly unmounted. Some data may be corrupt. Please run fsck.
root@linaro-alip:/# ls /mnt/sata
Alarms      Documents    Movies         Podcasts    test
Android     Download     Music          Recordings  test.wav
Audiobooks  Go-home.mp3  Notifications  Ringtones   testsata
DCIM        LOST.DIR     Pictures       sata
root@linaro-alip:/# df -h
Filesystem      Size  Used Avail Use% Mounted on
/dev/root       5.9G  3.0G  2.6G  54% /
devtmpfs        970M  8.0K  970M   1% /dev
tmpfs           981M     0  981M   0% /dev/shm
tmpfs           393M  1.6M  391M   1% /run
tmpfs           5.0M  4.0K  5.0M   1% /run/lock
/dev/mmcblk0p7  124M   12M  109M  10% /oem
/dev/mmcblk0p8  911M   40K  848M   1% /userdata
tmpfs           197M   40K  197M   1% /run/user/1000
/dev/sda1       112G  8.3M  112G   1% /mnt/sata
6.14 4G & GPS
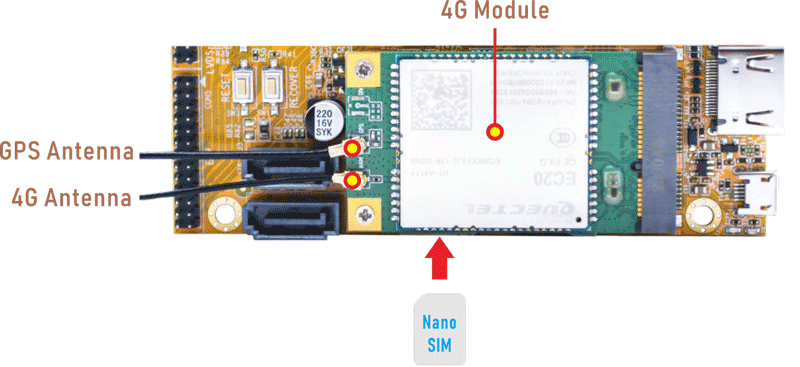
6.14.1 4G
❶ Insert 4G module to mPCIe slot (4G model: EC20/EC25).
❷ Connect antenna and insert SIM card.
❸ Execute commands to connect 4G network after power on.
1pppd call quectel-ppp &         //realize ppp dialing
2ifconfig                        //view network interface status
3ping -I ppp0 www.boardcon.com   //ping URL/IP to test network
6.14.2 GPS
❶ Plug the EC20 module to mPCIe socket.
❷ Connect GPS antenna.
❸ Power on.
❹ Execute commands to test GPS.
1echo -e "AT+QGPS=1\r\n" > /dev/ttyUSB2      //test GPS
2cat /dev/ttyUSB1
root@linaro-alip:/# echo -e "AT+QGPS=1\r\n" > /dev/ttyUSB2
root@linaro-alip:/# cat /dev/ttyUSB1
$GPVTG,,T,,M,,N,,K,N*2C

$GPGSA,A,1,,,,,,,,,,,,,,,,*1E

$GPGGA,,,,,,0,,,,,,,,*66

$GPRMC,,V,,,,,,,,,,N*53

$GPVTG,,T,,M,,N,,K,N*2C

$GPGSA,A,1,,,,,,,,,,,,,,,,*1E

$GPGGA,,,,,,0,,,,,,,,*66

$GPRMC,,V,,,,,,,,,,N*53
6.15 SPI
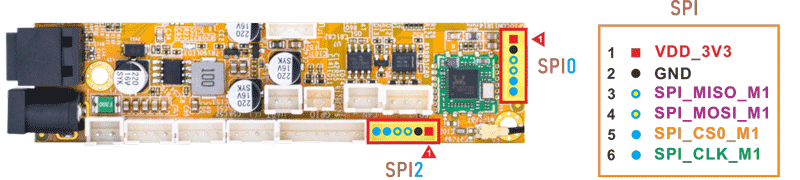
❶ Connect MISO_M1 and MOSI_M1 of SPI.
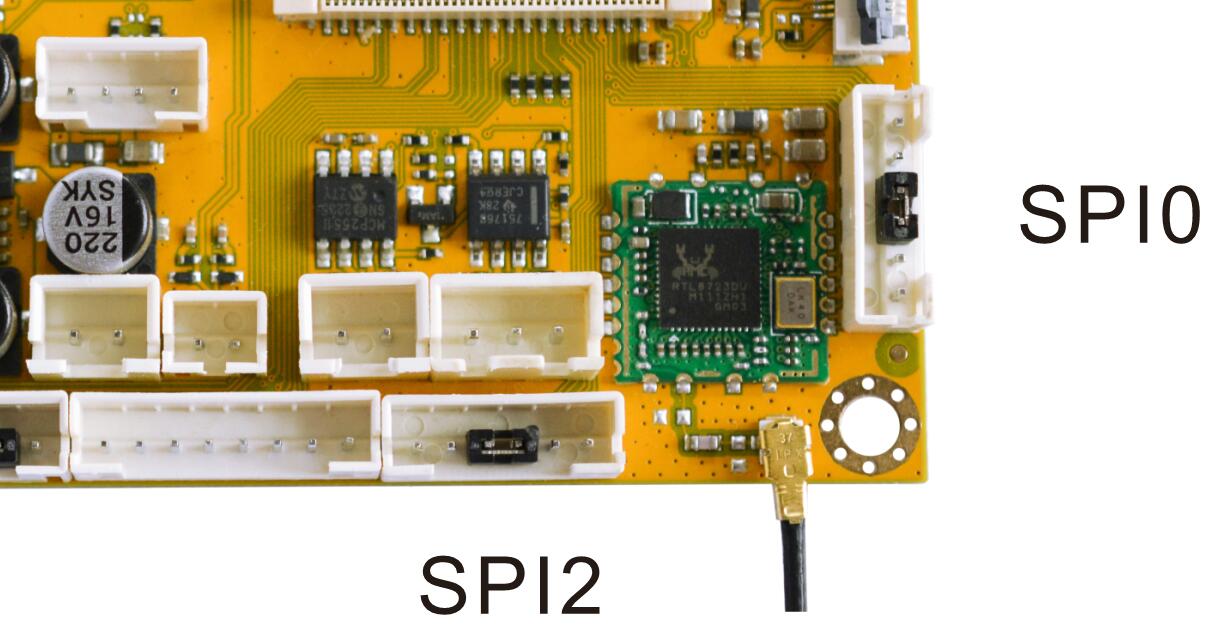
❷ Test SPI.
1spidev0.0_test          //test SPI0
2spidev2.0_test          //test SPI2
root@linaro-alip:/# spidev0.0_test
spi mode: 0
bits per word: 8
max speed: 500000 Hz (500 KHz)

FF FF FF FF FF FF
40 00 00 00 00 95
FF FF FF FF FF FF
FF FF FF FF FF FF
FF FF FF FF FF FF
DE AD BE EF BA AD
F0 0D
root@linaro-alip:/# spidev2.0_test
spi mode: 0
bits per word: 8
max speed: 500000 Hz (500 KHz)

FF FF FF FF FF FF
40 00 00 00 00 95
FF FF FF FF FF FF
FF FF FF FF FF FF
FF FF FF FF FF FF
DE AD BE EF BA AD
F0 0D
6.16 Keys
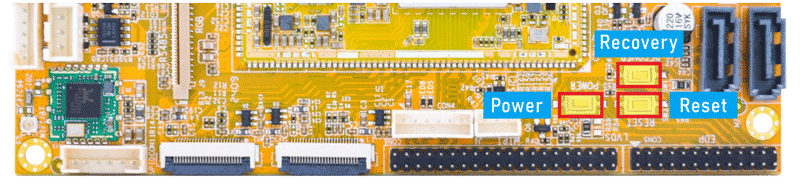
Recovery long press to enter loader mode.
Power short press to sleep/wake up, long press to shutdown/startup.
Reset restart the board.
6.17 video playback
6.17.1 Built-in playback
The script instruction directory is in /rockchip-test/video, just run it, as shown below.
root@linaro-alip:/# ls /rockchip-test/video/
test_dec-gst.sh     test_enc-gst.sh         test_gst_video_maxfps.sh
test_dec-mpv.sh     test_gst_multivideo.sh  video_stresstest.sh
test_dec-parole.sh  test_gst_video.sh       video_test.sh
test_dec-qt.sh      test_gst_video_fps.sh
root@linaro-alip:/# cd /rockchip-test/video/
root@linaro-alip:/rockchip-test/video#
root@linaro-alip:/rockchip-test/video# ./test_gst_video.sh
[  145.071183] dw9714 3-000c: cmd 0x80685600 not supported
Setting pipeline to PAUSED ...
Pipeline is PREROLLING ...
Redistribute latency...
mpp[2175]: mpp_info: mpp version: 239e15ea author: Herman Chen   2024-06-12 docs: Update 1.0.6 CHANGELOG.md
mpp[2175]: mpp_platform: client 12 driver is not ready!
mpp[2175]: mpp_info: mpp version: 239e15ea author: Herman Chen   2024-06-12 docs: Update 1.0.6 CHANGELOG.md
mpp[2175]: mpp_info: mpp version: 239e15ea author: Herman Chen   2024-06-12 docs: Update 1.0.6 CHANGELOG.md
mpp[2175]: mpp_info: mpp version: 239e15ea author: Herman Chen   2024-06-12 docs: Update 1.0.6 CHANGELOG.md
mpp[2175]: mpp_info: mpp version: 239e15ea author: Herman Chen   2024-06-12 docs: Update 1.0.6 CHANGELOG.md
Redistribute latency...
mpp[2175]: h264d_api: is_avcC=1
Pipeline is PREROLLED ...
Prerolled, waiting for async message to finish...
Setting pipeline to PLAYING ...
Redistribute latency...
New clock: GstSystemClock
Got EOS from element "pipeline0".
Execution ended after 0:00:29.560919972
Setting pipeline to NULL ...
Freeing pipeline ...
6.17.2 Browser playback
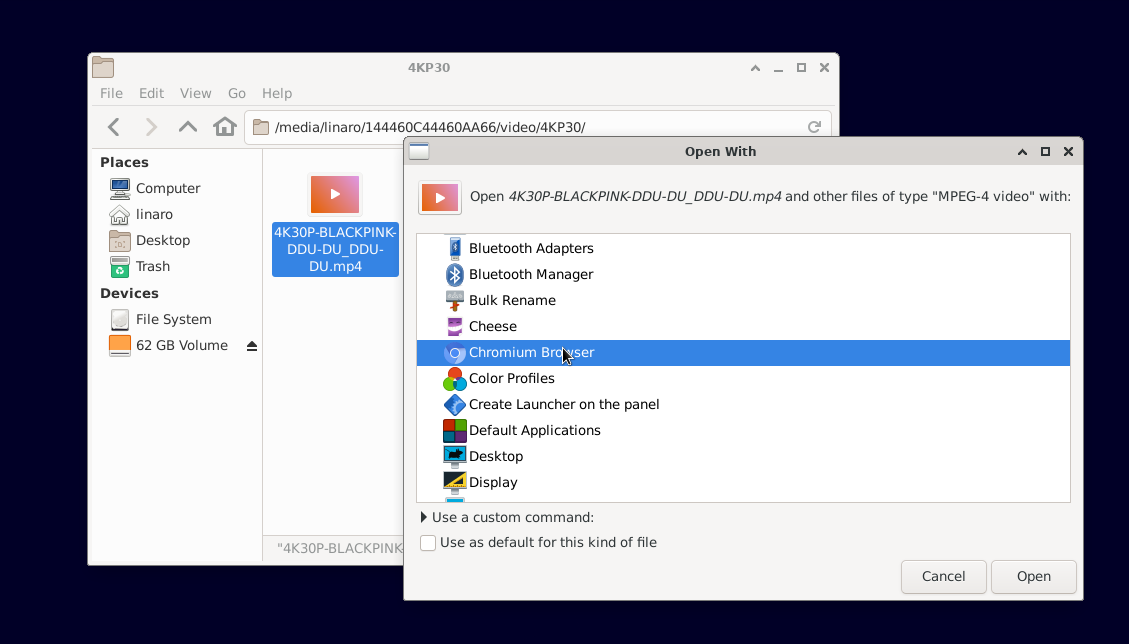
❶ Select the video file to be played, right-click the menu and select Open With Other Application…
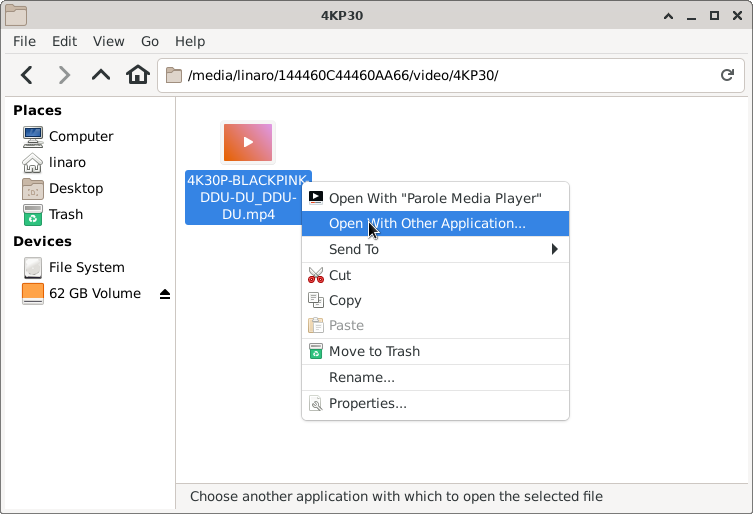
❷ Locate the Chromium Browser in the list and open it.
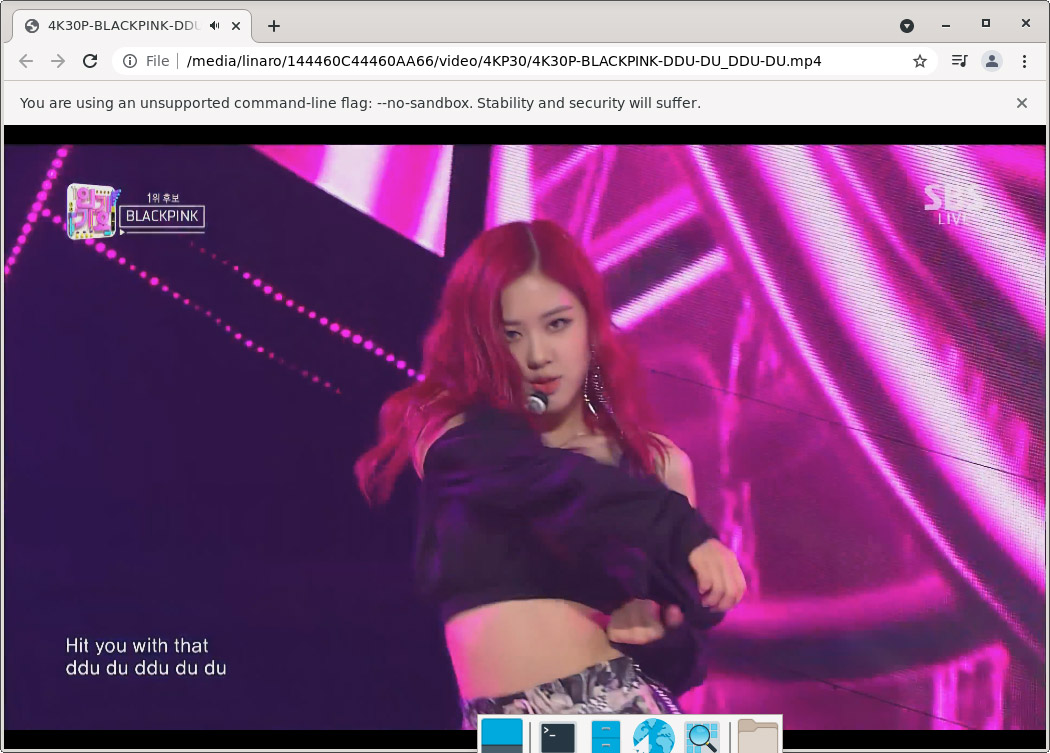
❸ Click the speaker icon in the upper right corner of the desktop to select the audio output channel.
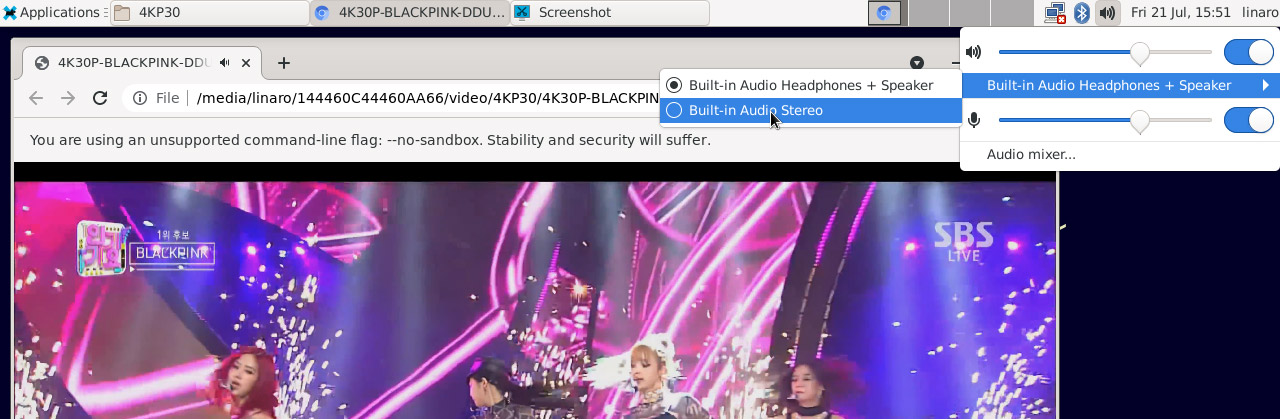
user can also start the browser with a command to play.
1chromium /media/linaro/144460C44460AA66/video/4KP30/4K30P-BLACKPINK-DDU-DU_DDU-DU.mp4
6.17.3 gst-play-1.0 playback
If some video chromium browser can’t play normally, user can use gst-play-1.0 to play.
1cat /sys/kernel/debug/dri/0/state | grep "plane\["    //select the display for playback
2export GST_MPP_VIDEODEC_DEFAULT_ARM_AFBC=1            //be sure to open AFBC
3GST_DEBUG=*mpp*:4 gst-play-1.0 --flags=3 --videosink="kmssink plane-id=129" /media/linaro/144460C44460AA66/video/H265_HEVC/I.O.I-Dream.Girl.2160p.UHDTV.H265.ts  --audiosink="alsasink device=hw:1,0"       //select sound card 4, audio output via HDMI
root@linaro-alip:/# cat /sys/kernel/debug/dri/0/state | grep "plane\["
plane[57]: Smart1-win0
plane[79]: Smart0-win0
plane[101]: Esmart1-win0
plane[115]: Esmart0-win0
plane[129]: Cluster0-win0
plane[143]: Cluster1-win0
root@linaro-alip:/# export GST_MPP_VIDEODEC_DEFAULT_ARM_AFBC=1
root@linaro-alip:/# GST_DEBUG=*mpp*:4 gst-play-1.0 --flags=3 --videosink="kmssink plane-id=143" /media/linaro/144460C44460AA66/video/H265_HEVC/I.O.I-Dream.Girl.2160p.UHDTV.H265.ts --audiosink="alsasink device=hw:1,0"
Press 'k' to see a list of keyboard shortcuts.
Now playing /media/linaro/144460C44460AA66/video/H265_HEVC/I.O.I-Dream.Girl.2160p.UHDTV.H265.ts
0:00:01.210302580  2278   0x7f80010f00 INFO                  mppdec gstmppdec.c:519:gst_mpp_dec_apply_info_change:<mppvideodec0> applying NV12(AFBC) 3840x2160 (3840x2176)
WARNING No volume control found
WARNING debug information: ../gst/playback/gstplaysink.c(2893): gen_audio_chain (): /GstPlayBin:playbin/GstPlaySink:playsink:
Volume/mute is not available
0:00:01.238902541  2278   0x7f80010f00 INFO                  mppdec gstmppdec.c:943:gst_mpp_dec_loop:<mppvideodec0> video info changed
0:00:01.239011041  2278   0x7f80010f00 WARN                  mppdec gstmppdec.c:590:gst_mpp_dec_get_frame:<mppvideodec0> MPP is not able to generate pts
Redistribute latency...
0:00:08.9 / 0:18:47.1