2. Buildroot Application
2.1 Serial Terminal

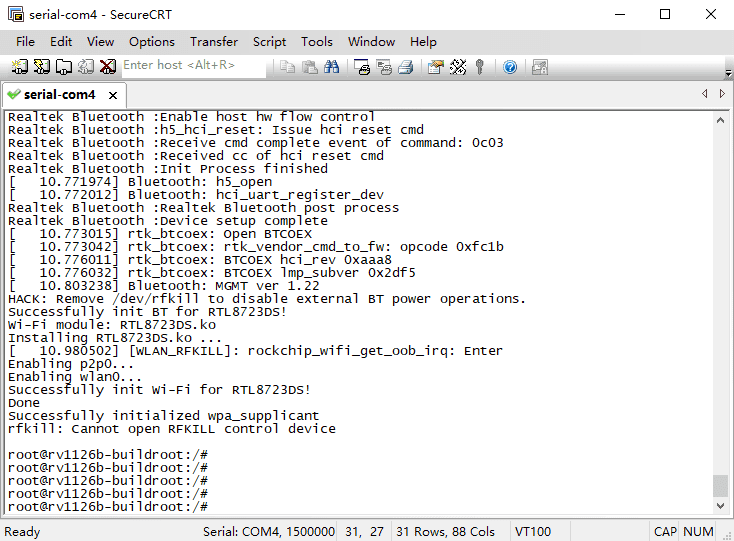
Connect the board and PC with USB Serial cable, then power on, the terminal will output boot information. The default baudrate is 1500000.
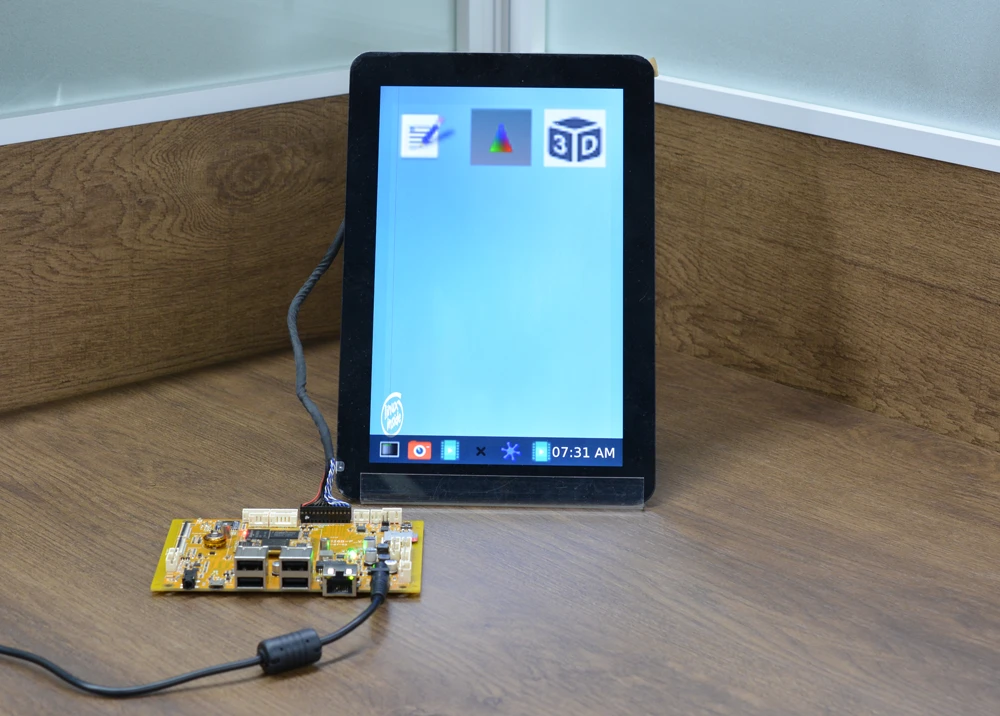
2.2 Display(MIPI)
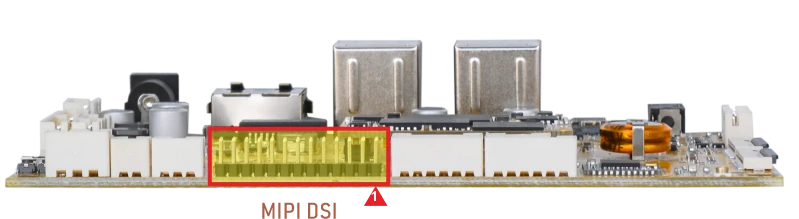
Connect the board and MIPI LCD (default 800×1280 @60Hz), then start up.
2.3 USB
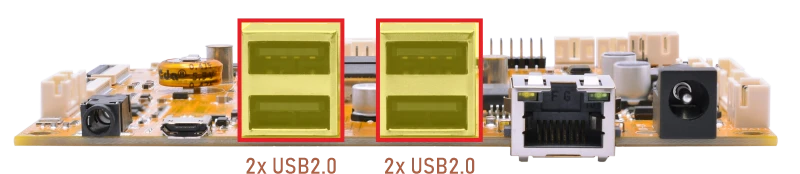
2.3.1 USB Host
The USB2.0 Host can connect peripherals such as mouse, keyboards, and flash drives.
When a USB flash drive is inserted, the system will automatically mount it.
1df -h
root@rv1126b-buildroot:/# df -h
Filesystem      Size  Used Avail Use% Mounted on
/dev/root       6.0G  421M  5.3G   8% /
devtmpfs        960M     0  960M   0% /dev
tmpfs           987M  136K  987M   1% /tmp
tmpfs           987M  544K  987M   1% /run
tmpfs           987M  164K  987M   1% /var/log
tmpfs           987M     0  987M   0% /dev/shm
/dev/mmcblk0p8  881M  292K  864M   1% /userdata
/dev/mmcblk0p7  123M   12M  109M  10% /oem
/dev/sda1        58G   39G   20G  67% /mnt/udisk
/dev/sdb2       448M  327M  121M  74% /media/udisk1
/dev/sdb1        28G   24G  4.7G  84% /media/udisk2
2.3.2 USB OTG(ADB)
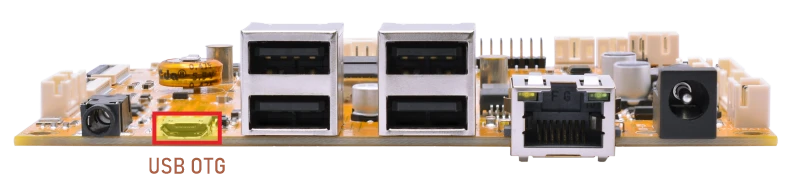
By default, the OTG port operates in Device mode, allowing ADB connections for debugging.
To enable ADB on a Windows PC, please follow the steps below.
❶ Connect the board and PC host with Micro USB cable.
❷ Install ADB driver on Windows system.
❸ Press Windows+R, type cmd, and press Enter to open the command prompt.
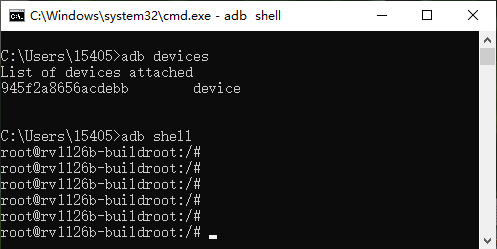
❹ Run the following command to check ADB connection.
1adb shell
2.4 Ethernet
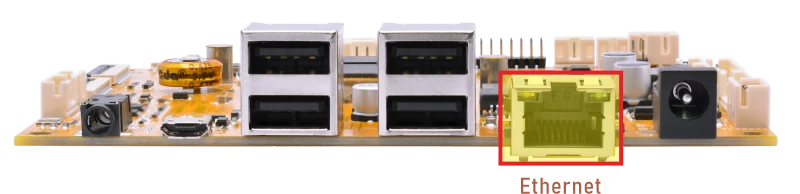
Connect the board to the router via Ethernet; DHCP is enabled for auto-IP. User can ping URL/IP at terminal.
1ifconfig //view the status of the network interfaces
root@rv1126b-buildroot:/# ifconfig
eth0      Link encap:Ethernet  HWaddr FA:B2:1C:0E:F2:D4
          inet addr:192.168.0.124  Bcast:192.168.0.255  Mask:255.255.255.0
          inet6 addr: fe80::8f56:d77d:6c3a:38a2/64 Scope:Link
          UP BROADCAST RUNNING MULTICAST  MTU:1500  Metric:1
          RX packets:85 errors:0 dropped:16 overruns:0 frame:0
          TX packets:11 errors:0 dropped:0 overruns:0 carrier:0
          collisions:0 txqueuelen:1000
          RX bytes:7960 (7.7 KiB)  TX bytes:1410 (1.3 KiB)
         Interrupt:74
1ping -I eth0 www.armdesigner.com //ping URL to test Network
root@rv1126b-buildroot:/# ping -I eth0 www.armdesigner.com
PING www.armdesigner.com (3.174.46.90) from 192.168.0.124 eth0: 56(84) bytes of data.
64 bytes from www.armdesigner.com (3.174.46.90): icmp_seq=1 ttl=50 time=196 ms
64 bytes from www.armdesigner.com (3.174.46.90): icmp_seq=2 ttl=50 time=191 ms
64 bytes from www.armdesigner.com (3.174.46.90): icmp_seq=3 ttl=50 time=194 ms
64 bytes from www.armdesigner.com (3.174.46.90): icmp_seq=4 ttl=50 time=193 ms
64 bytes from www.armdesigner.com (3.174.46.90): icmp_seq=5 ttl=50 time=191 ms
64 bytes from www.armdesigner.com (3.174.46.90): icmp_seq=6 ttl=50 time=194 ms
64 bytes from www.armdesigner.com (3.174.46.90): icmp_seq=7 ttl=50 time=191 ms
^C
--- www.armdesigner.com ping statistics ---
7 packets transmitted, 7 received, 0% packet loss, time 6008ms
rtt min/avg/max/mdev = 190.700/192.683/195.603/1.853 ms
2.5 SD Card
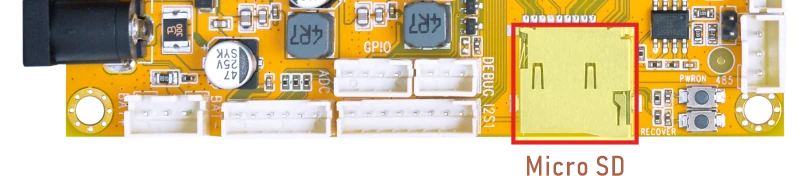
Insert the SD card into the development board, and it will be automatically mounted.
1df -h //View the device mount path
root@rv1126b-buildroot:/# df -h
Filesystem      Size  Used Avail Use% Mounted on
/dev/root       6.0G  421M  5.3G   8% /
devtmpfs        960M     0  960M   0% /dev
tmpfs           987M  136K  987M   1% /tmp
tmpfs           987M  556K  987M   1% /run
tmpfs           987M  172K  987M   1% /var/log
tmpfs           987M     0  987M   0% /dev/shm
/dev/mmcblk0p8  881M  292K  864M   1% /userdata
/dev/mmcblk0p7  123M   12M  109M  10% /oem
/dev/sda1        58G   39G   20G  67% /mnt/udisk
/dev/sdb2       448M  327M  121M  74% /media/udisk1
/dev/sdb1        28G   24G  4.7G  84% /media/udisk2
/dev/mmcblk1p1  120G   85M  119G   1% /mnt/sdcard
2.6 WiFi & Bluetooth
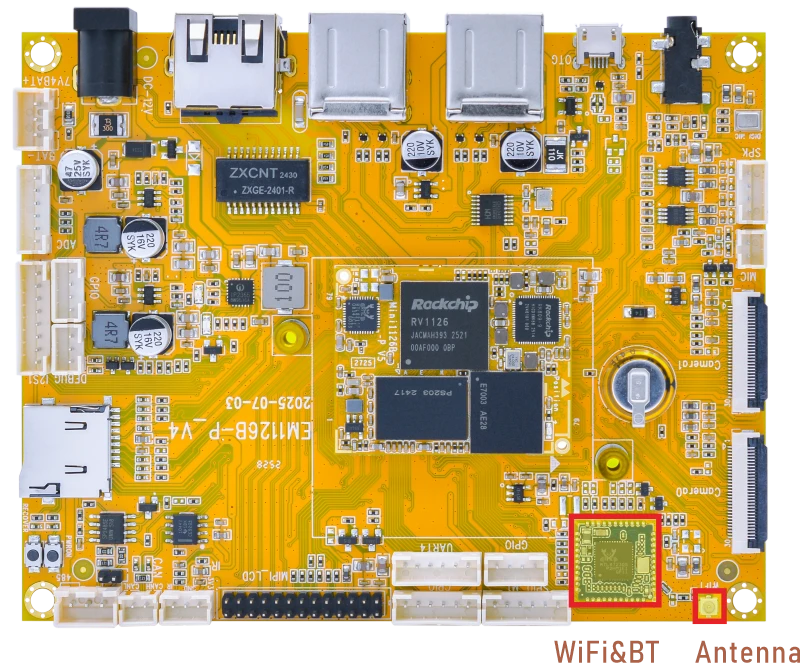
2.6.1 WiFi
❶ Connect the WiFi antenna.
❷ View the device information.
1ifconfig
root@rv1126b-buildroot:/# ifconfig
p2p0      Link encap:Ethernet  HWaddr AA:B5:8E:B9:3B:9A
          UP BROADCAST MULTICAST  MTU:1500  Metric:1
          RX packets:0 errors:0 dropped:0 overruns:0 frame:0
          TX packets:0 errors:0 dropped:0 overruns:0 carrier:0
          collisions:0 txqueuelen:1000
          RX bytes:0 (0.0 B)  TX bytes:0 (0.0 B)

wlan0     Link encap:Ethernet  HWaddr A8:B5:8E:B9:3B:9A
          UP BROADCAST MULTICAST  MTU:1500  Metric:1
          RX packets:0 errors:0 dropped:0 overruns:0 frame:0
          TX packets:0 errors:0 dropped:0 overruns:0 carrier:0
          collisions:0 txqueuelen:1000
          RX bytes:0 (0.0 B)  TX bytes:0 (0.0 B)
❸ Search for available WiFi hotspots.
1iwlist wlan0 scan
❹ Connect hotspot.
1wifi-connect.sh SSID PSK //'SSID': user SSID, 'PSK': password
After connected, ping URL/IP at terminal to test network.
1ifconfig
2ping -I wlan0 www.armdesigner.com
2.6.2 Bluetooth
In Buildroot system, Bluetooth can be configured to act as a Bluetooth speaker.
❶ Select audio output
2=Speaker, 3=Headset
1amixer -c 0 cset numid=37 3
root@rv1126b-buildroot:/# amixer -c 0 cset numid=37 3
numid=37,iface=MIXER,name='Playback Path'
  ; type=ENUMERATED,access=rw------,values=1,items=11
  ; Item #0 'OFF'
  ; Item #1 'RCV'
  ; Item #2 'SPK'
  ; Item #3 'HP'
  ; Item #4 'HP_NO_MIC'
  ; Item #5 'BT'
  ; Item #6 'SPK_HP'
  ; Item #7 'RING_SPK'
  ; Item #8 'RING_HP'
  ; Item #9 'RING_HP_NO_MIC'
  ; Item #10 'RING_SPK_HP'
  : values=3
❷ Start the BlueALSA service in A2DP Sink mode.
1bluealsa -p a2dp-sink &
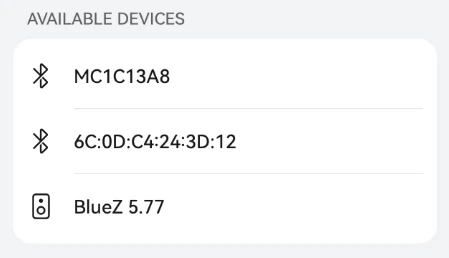
❸ Scan for the Bluetooth device address.
1hcitool scan
root@rv1126b-buildroot:/# hcitool scan
Scanning ...
[11524.399998] rtk_btcoex: hci (periodic)inq start
[11524.649082] Bluetooth: hu 00000000fc1e59f2 retransmitting 1 pkts
[11534.893160] rtk_btcoex: inquiry complete
        28:D0:43:39:FE:0E       HUANG
        A8:35:12:9A:EB:4D       liuy
        2C:A0:42:D1:14:D5       Kang
❹ Start audio playback via BlueALSA (route A2DP to ALSA).
1bluealsa-aplay A8:35:12:9A:EB:4D & //replace 'A8:35:12:9A:EB:4D' with your Bluetooth MAC address
❺ Allow Bluetooth to be searched.
1hciconfig hci0 piscan
❻ Allow Bluetooth to be pairable
1bluetoothctl
root@rv1126b-buildroot:/# bluetoothctl
hci0 new_settings: powered connectable discoverable bondable ssp br/edr le secure-conn
Agent registered
[CHG] Controller A8:B5:8E:B9:3B:9B Pairable: yes
[bluetooth]#
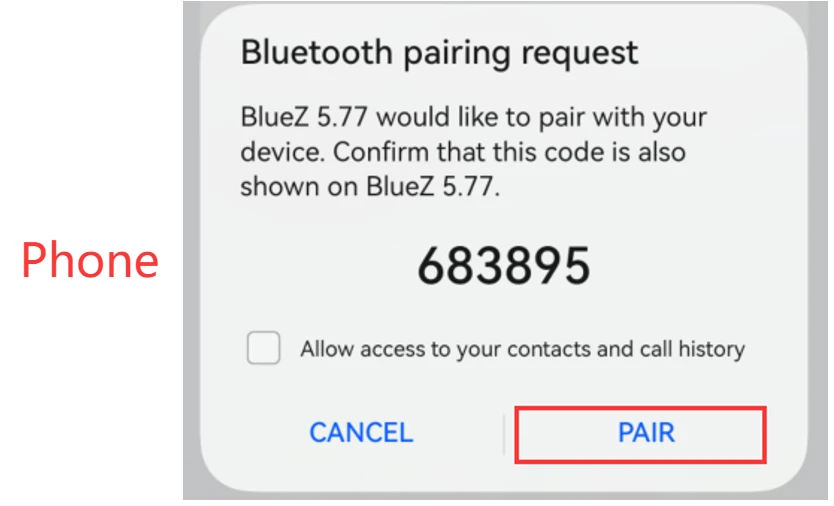
❼ On the phone, locate the device name of the speaker BlueZ 5.77 and click to connect.
❽ Permissions must be confirmed on both the phone and the speaker.
root@rv1126b-buildroot:/# bluetoothctl
hci0 new_settings: powered connectable discoverable bondable ssp br/edr le secure-conn
Agent registered
[CHG] Controller A8:B5:8E:B9:3B:9B Pairable: yes
[bluetooth]# [  594.070562] rtk_btcoex: hci accept conn req
[  594.287289] rtk_btcoex: connected, handle 0004, status 0x00
[  594.287332] rtk_btcoex: Page success
hci0 A8:35:12:9A:EB:4D type BR/EDR connected eir_len 5
hci0 A8:35:12:9A:EB:4D type BR/EDR connected eir_len 5
[bluetooth]# bluealsa: [1883] D: bluez.c:1199: Signal: org.freedesktop.DBus.ObjectManager.InterfacesAdded()
[NEW] Device A8:35:12:9A:EB:4D A8-35-12-9A-EB-4D
[A8-35-12-9A-EB-4D]# [  594.378463] rtk_btcoex: io capability request
hci0 A8:35:12:9A:EB:4D type BR/EDR connected eir_len 11
[CHG] Device A8:35:12:9A:EB:4D Name: liuy
[CHG] Device A8:35:12:9A:EB:4D Alias: liuy
hci0 A8:35:12:9A:EB:4D type BR/EDR connected eir_len 5
hci0 A8:35:12:9A:EB:4D type BR/EDR connected eir_len 5
hci0 A8:35:12:9A:EB:4D type BR/EDR connected eir_len 5
hci0 A8:35:12:9A:EB:4D type BR/EDR connected eir_len 5
Request confirmation
[agent] Confirm passkey 630905 (yes/no): yes
2.7 Audio
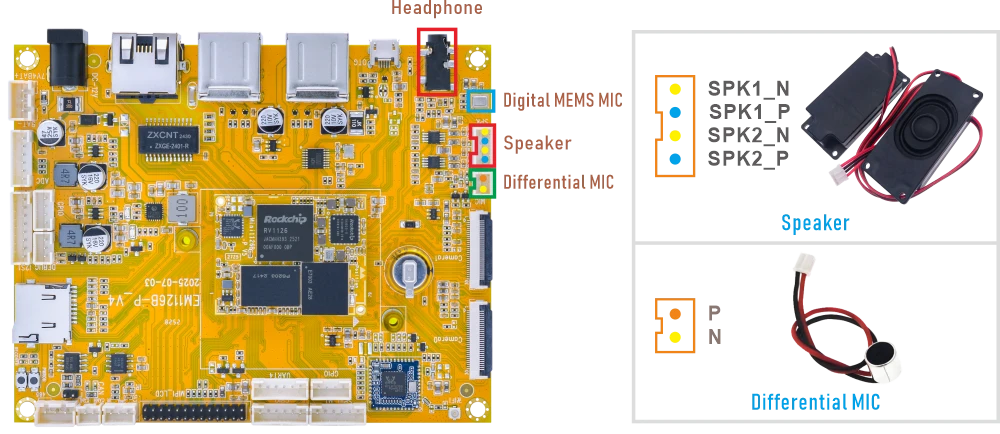
2.7.1 Audio Input
1cat /proc/asound/cards //view sound card
root@rv1126b-buildroot:/# cat /proc/asound/cards
 0 [rockchiprk809co]: simple-card - rockchip,rk809-codec
                      rockchip,rk809-codec
 1 [rockchippdmmica]: simple-card - rockchip,pdm-mic-array
                     rockchip,pdm-mic-array
❶ Connect the MIC to the connector (2-pin/2.0mm pitch).
❷ Execute the commands.
1amixer -c 0 cset numid=38 1
2arecord -Dhw:0,0 -f cd -t wav test.wav
Serial terminal outputroot@rv1126b-buildroot:/# amixer -c 0 cset numid=38 1 numid=38,iface=MIXER,name='Capture MIC Path' ; type=ENUMERATED,access=rw------,values=1,items=4 ; Item #0 'MIC OFF' ; Item #1 'Main Mic' ; Item #2 'Hands Free Mic' ; Item #3 'BT Sco Mic' : values=1 root@rv1126b-buildroot:/# arecord -Dhw:0,0 -f cd -t wav test.wav Recording WAVE 'test.wav' : Signed 16 bit Little Endian, Rate 44100 Hz, Stereo
1arecord -D hw:1,0 -f s16_le -c 2 -r 16000 cap.wav
root@rv1126b-buildroot:/# arecord -D hw:1,0 -f s16_le -c 2 -r 16000 cap.wav
Recording WAVE 'cap.wav' : Signed 16 bit Little Endian, Rate 16000 Hz, Stereo
2.7.2 Audio Output
❶ Plug the headphone into the 3.5mm Audio jack.
❷ Execute the commands.
1amixer -c 0 cset numid=37 3
root@rv1126b-buildroot:/# amixer -c 0 cset numid=37 3
numid=37,iface=MIXER,name='Playback Path'
 ; type=ENUMERATED,access=rw------,values=1,items=11
 ; Item #0 'OFF'
 ; Item #1 'RCV'
 ; Item #2 'SPK'
 ; Item #3 'HP'
 ; Item #4 'HP_NO_MIC'
 ; Item #5 'BT'
 ; Item #6 'SPK_HP'
 ; Item #7 'RING_SPK'
 ; Item #8 'RING_HP'
 ; Item #9 'RING_HP_NO_MIC'
 ; Item #10 'RING_SPK_HP'
 : values=3
❶ Connect the Speaker to the connector (4-pin/2.0mm pitch).
❷ Execute the commands.
1amixer -c 0 cset numid=37 2
root@rv1126b-buildroot:/# amixer -c 0 cset numid=37 2
numid=37,iface=MIXER,name='Playback Path'
 ; type=ENUMERATED,access=rw------,values=1,items=11
 ; Item #0 'OFF'
 ; Item #1 'RCV'
 ; Item #2 'SPK'
 ; Item #3 'HP'
 ; Item #4 'HP_NO_MIC'
 ; Item #5 'BT'
 ; Item #6 'SPK_HP'
 ; Item #7 'RING_SPK'
 ; Item #8 'RING_HP'
 ; Item #9 'RING_HP_NO_MIC'
 ; Item #10 'RING_SPK_HP'
 : values=2
2.8 IR
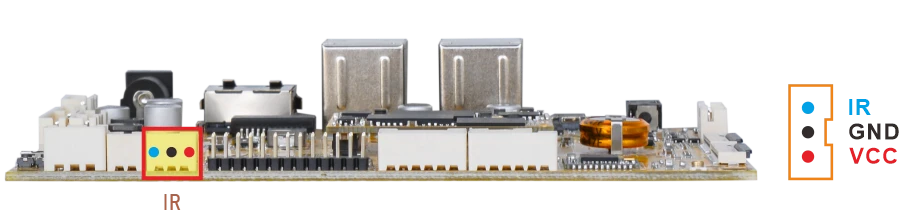
❶ Connect the IR receiver.
❷ Open IR debugging print.
1echo 1 > /sys/module/rockchip_pwm_remotectl/parameters/code_print
❸ Press remote button, key value printed to log.
root@rv1126b-buildroot:/# echo 1 > /sys/module/rockchip_pwm_remotectl/parameters/code_print
[  293.297790] USERCODE=0x1818
[  293.325015] RMC_GETDATA=9a
[  294.217858] USERCODE=0x1818
[  294.244995] RMC_GETDATA=99
[  294.837300] USERCODE=0x1818
[  294.864505] RMC_GETDATA=98
[  295.241483] USERCODE=0x1818
[  295.268684] RMC_GETDATA=9b
2.9 RS485
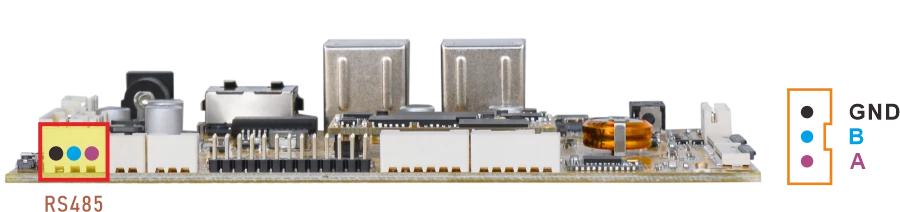
❶ Connect PC and board with USB-to-RS485 adapter.

RS485 connection
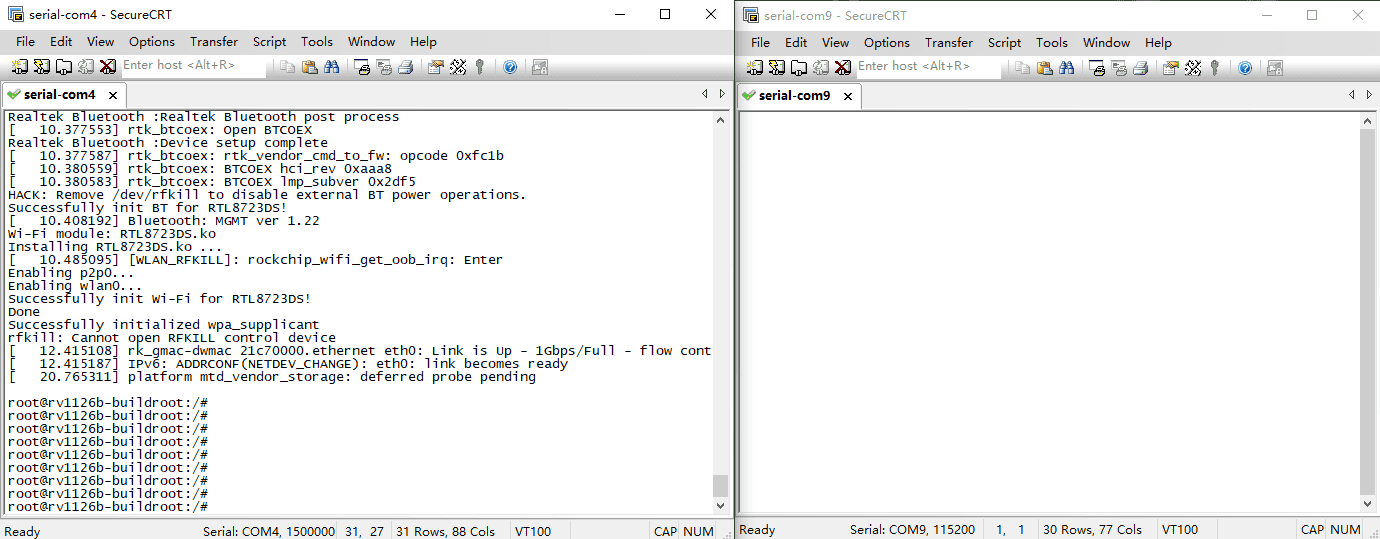
❷ Open the Serial Terminal and set baud rate for the board and RS485 adapter respectively.
Baud rate: board - 1500000; RS485 adapter - 115200
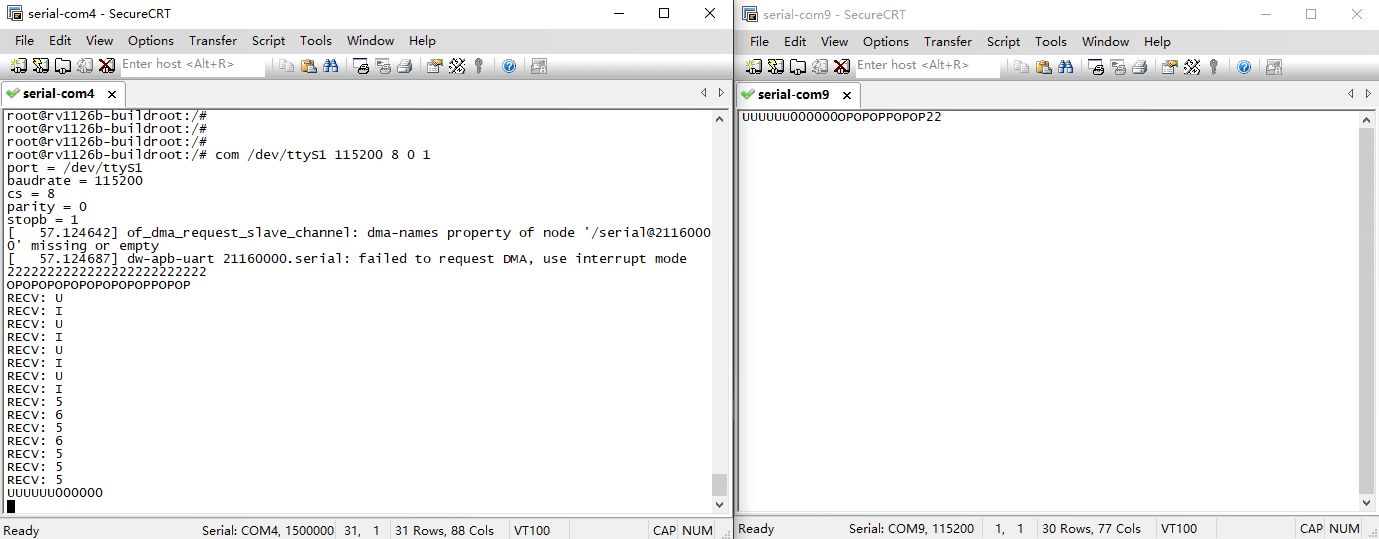
❸ Execute command on the terminal serial port of board.
1com /dev/ttyS1 115200 8 0 1
❹ Input character to test RS485 communication.
2.10 UART
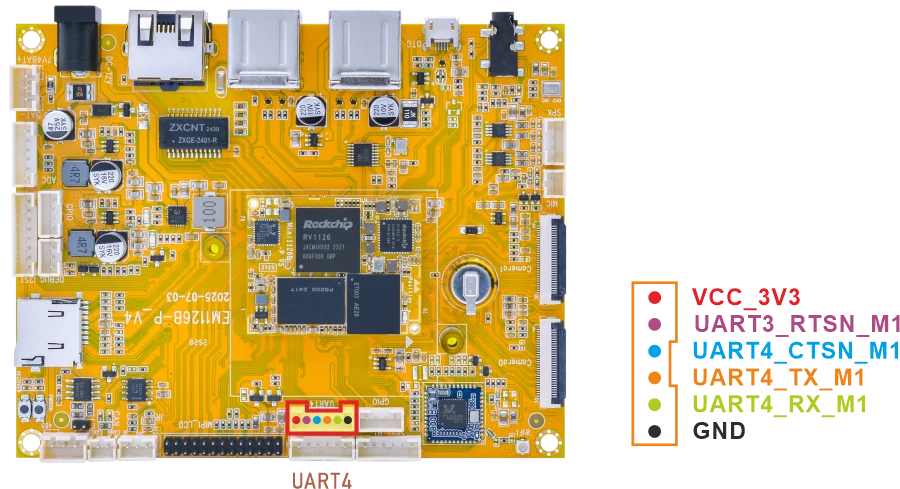
❶ Connect RX and TX of UART4.
❷ Execute command and input character to test.
1com /dev/ttyS4 115200 8 0 1
root@rv1126b-buildroot:/# com /dev/ttyS4 115200 8 0 1
port = /dev/ttyS4
baudrate = 115200
cs = 8
parity = 0
stopb = 1
555555555555555
RECV: 555555555555555
ooooooooo
RECV: ooooooooo
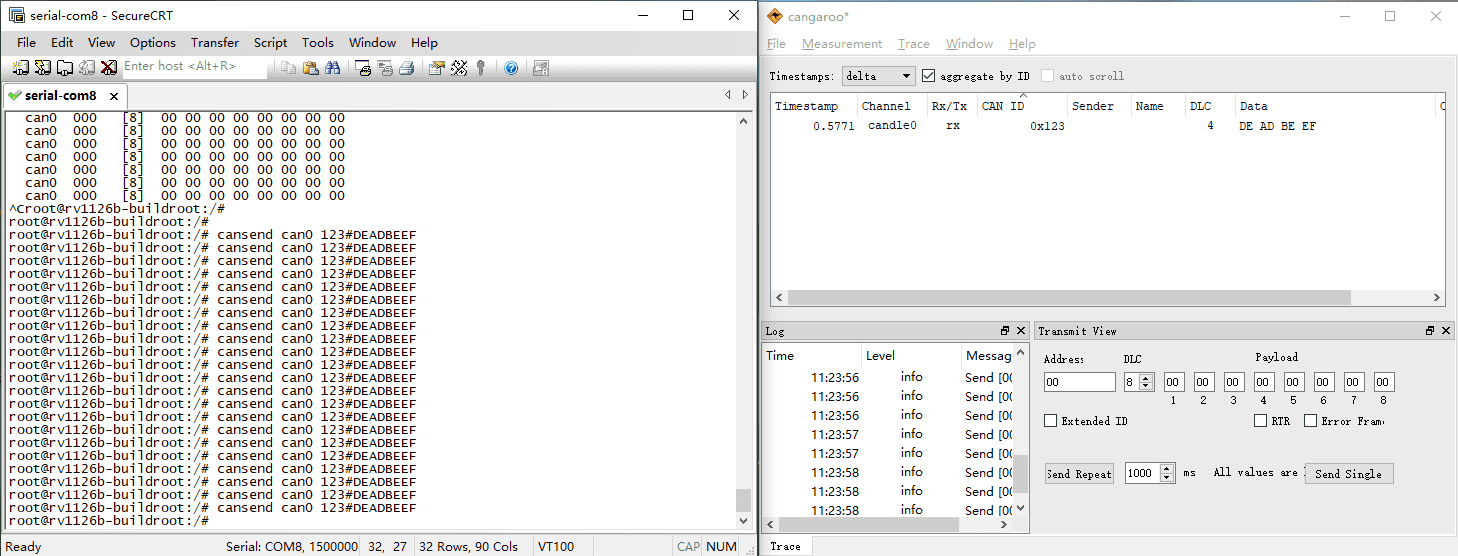
2.11 CAN
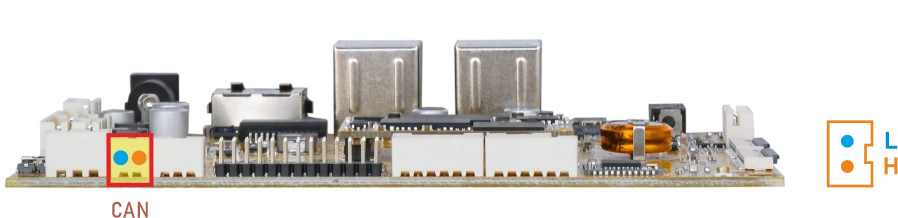
❶ Connect PC and board with USB-to-CAN adapter.
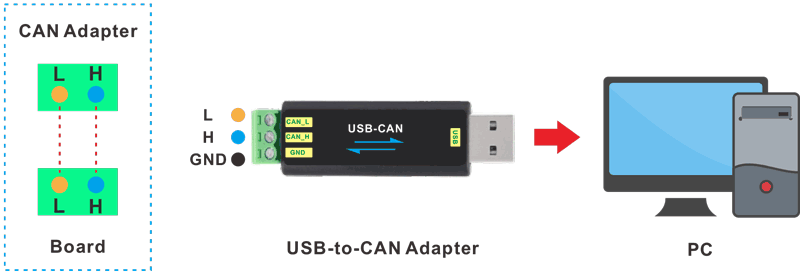
CAN connection
❷ Open the CAN application and set the baudrate to 500000 on PC.
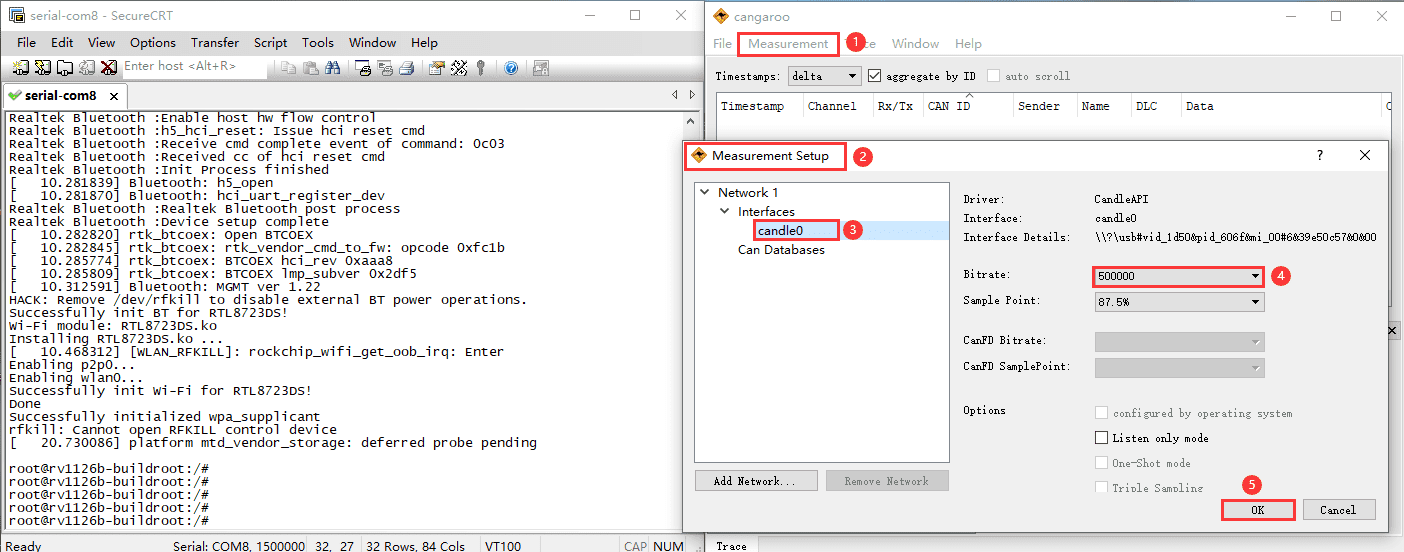
❸ Execute commands on Serial Terminal to configure and start the CAN network.
1ip link set can0 down
2ip link set can0 type can bitrate 500000 dbitrate 500000 fd on
3ip link set can0 up
❹ Configure CAN as receiver.
1candump can0
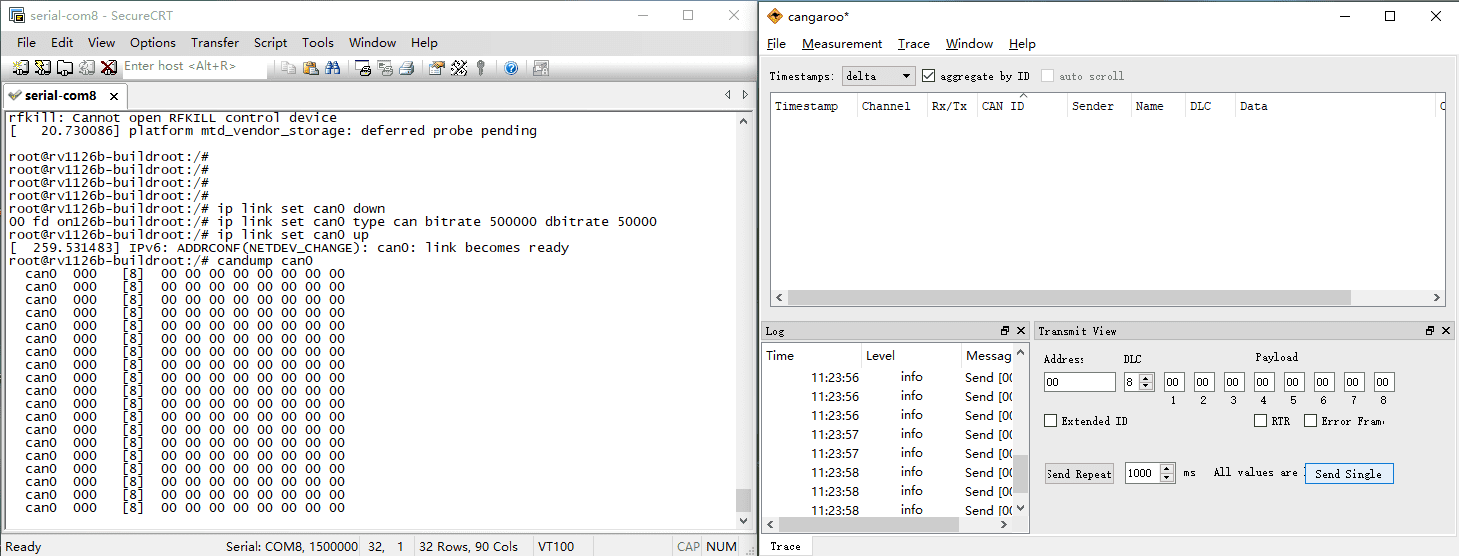
❺ Set CAN as Transmitter.
1cansend can0 123#DEADBEEF
2.12 SPI
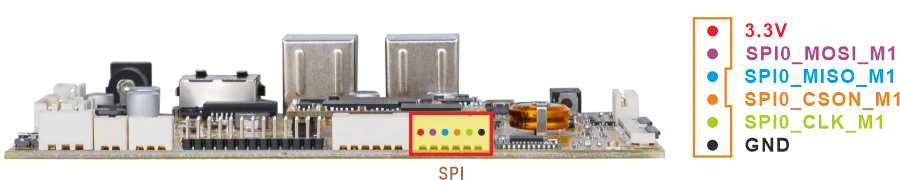
❶ Connect MOSI and MISO of SPI.
❷ Execute command to test.
1spidev-test
root@rv1126b-buildroot:/# spidev-test
spi mode: 0
bits per word: 8
max speed: 10000000 Hz (10000 KHz)

EE FF FF FF FF FF
40 00 00 00 00 95
FF FF FF FF FF FF
FF FF FF FF FF FF
FF FF FF FF FF FF
DE AD BE EF BA AD
F0 0D
2.13 ADC
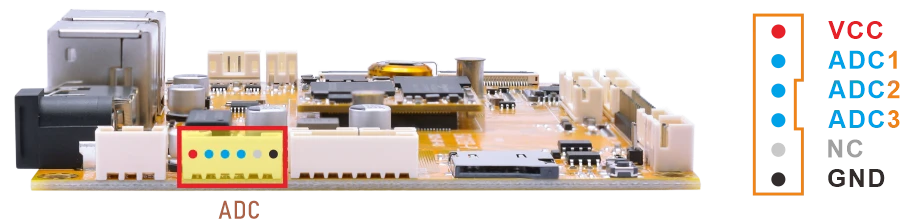
Connect the ADC pin to two different voltage levels within 0~1.8V respectively. For each level, after setting the pin to that level, execute the test command.
1cat /sys/bus/iio/devices/iio:\device0/in_voltage1_raw //test ADC1
root@rv1126b-buildroot:/# cat /sys/bus/iio/devices/iio:\device0/in_voltage1_raw
42
root@rv1126b-buildroot:/# cat /sys/bus/iio/devices/iio:\device0/in_voltage1_raw
8191
1cat /sys/bus/iio/devices/iio:\device0/in_voltage2_raw //test ADC2
1cat /sys/bus/iio/devices/iio:\device0/in_voltage3_raw //test ADC3
2.14 Battery Supply
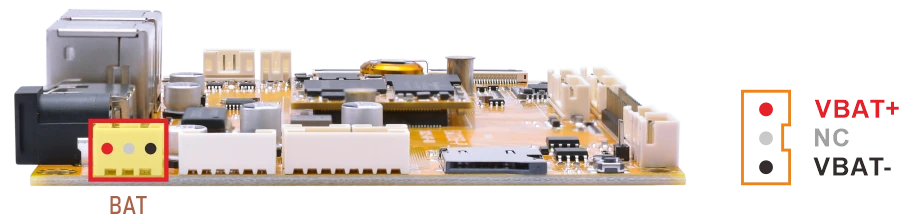
❶ Connect the 7.4V Li-ion battery to the BAT connector.
❷ Execute the command to check the current voltage.
1cat /sys/class/power_supply/battery/voltage_now
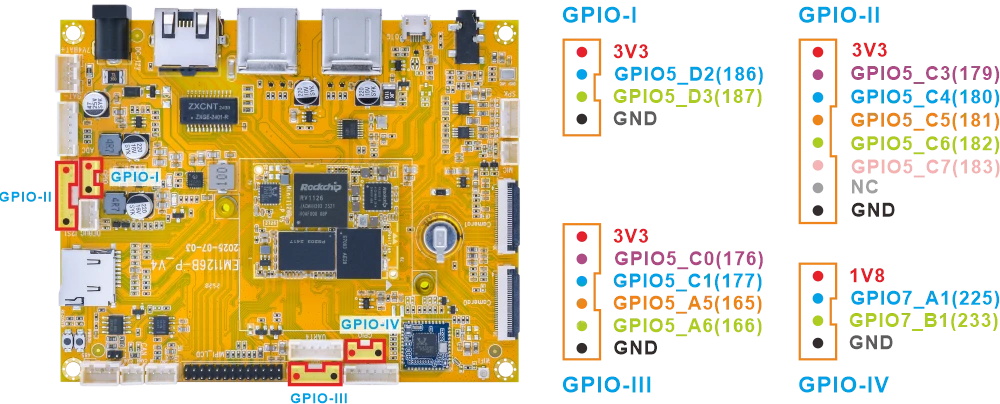
2.15 GPIO
# Export the GPIO and set it as output
gpio_ctrl.sh x export

# Set output to high level
gpio_ctrl.sh x set 1

# Read the current GPIO level
gpio_ctrl.sh x get

# Set output to low level (should be 1)
gpio_ctrl.sh x set 0

# Read the GPIO level again (should be 0)
gpio_ctrl.sh x get

# Unexport GPIO
gpio_ctrl.sh x unexport
Test GPIO-186 for example.
1gpio_ctrl.sh 186 export
2gpio_ctrl.sh 186 set 1
3gpio_ctrl.sh 186 get
4gpio_ctrl.sh 186 set 0
5gpio_ctrl.sh 186 get
6gpio_ctrl.sh 186 unexport
root@rv1126b-buildroot:/# gpio_ctrl.sh 186 export
GPIO186 exported as out
root@rv1126b-buildroot:/# gpio_ctrl.sh 186 set 1
GPIO186 set to 1
root@rv1126b-buildroot:/# gpio_ctrl.sh 186 get
GPIO186 value: 1
root@rv1126b-buildroot:/# gpio_ctrl.sh 186 set 0
GPIO186 set to 0
root@rv1126b-buildroot:/# gpio_ctrl.sh 186 get
GPIO186 value: 0
root@rv1126b-buildroot:/# gpio_ctrl.sh 186 unexport
GPIO186 unexported
2.16 Camera
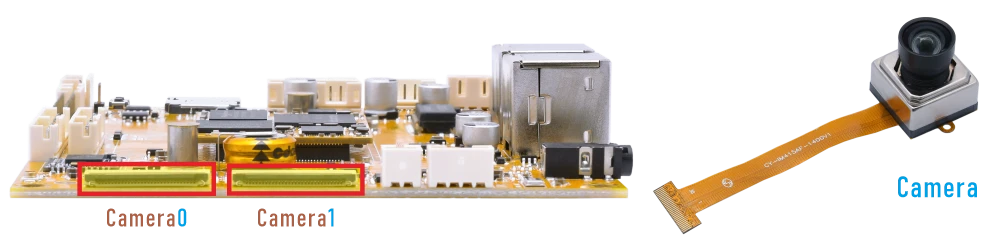
❶ Connect the camera to the board and power on.
❷ Execute command to preview camera0.
1./rockchip-test/camera/boardcon-camera0-test.sh
root@rv1126b-buildroot:/# ./rockchip-test/camera/boardcon-camera0-test.sh
Setting pipeline to PAUSED ...
Using mplane plugin for capture
Pipeline is live and does not need PREROLL ...
Pipeline is PREROLLED ...
Setting pipeline to PLAYING ...
/GstPipeline:pipeline0/GstV4l2Src:v4l2src0: crop-bounds = < (int)0, (int)0, (int)3840, (int)2160 >
New clock: GstSystemClock
/GstPipeline:pipeline0/GstV4l2Src:v4l2src0.GstPad:src: caps = video/x-raw, format=(string)NV12, width=(int)640, height=(int)480, framerate=(fraction)30/1, pixel-aspect-ratio=(fraction)1/1, interlace-mode=(string)progressive, colorimetry=(string)bt601
[ 1930.612903] rkisp_hw 21d00000.isp: set isp clk = 500000000Hz
/GstPipeline:pipeline0/GstCapsFilter:capsfilter0.GstPad:src: caps = video/x-raw, format=(string)NV12, width=(int)640, height=(int)480, framerate=(fraction)30/1, pixel-aspect-ratio=(fraction)1/1, interlace-mode=(string)progressive, colorimetry=(string)bt601
/GstPipeline:pipeline0/GstWaylandSink:waylandsink0.GstPad:sink: caps = video/x-raw, format=(string)NV12, width=(int)640, height=(int)480, framerate=(fraction)30/1, pixel-aspect-ratio=(fraction)1/1, interlace-mode=(string)progressive, colorimetry=(string)bt601
/GstPipeline:pipeline0/GstCapsFilter:capsfilter0.GstPad:sink: caps = video/x-raw, format=(string)NV12, width=(int)640, height=(int)480, framerate=(fraction)30/1, pixel-aspect-ratio=(fraction)1/1, interlace-mode=(string)progressive, colorimetry=(string)bt601
[ 1930.628943] rkisp rkisp-vir0: first params buf queue
[ 1930.629259] rkcif-mipi-lvds: stream[0] start streaming
[ 1930.629653] rockchip-mipi-csi2 mipi0-csi2: stream on, src_sd: 00000000eead2424, sd_name:rockchip-csi2-dphy0
[ 1930.629676] rockchip-mipi-csi2 mipi0-csi2: stream ON
[ 1930.629727] rockchip-csi2-dphy0: dphy0, data_rate_mbps 892
[ 1930.629760] rockchip-csi2-dphy csi2-dphy0: csi2_dphy_s_stream stream on:1, dphy0, ret 0
[ 1930.629772] imx415 1-0036: s_stream: 1. 3864x2192, hdr: 0, bpp: 10
[ 1930.742265] rkcif-mipi-lvds: Warning: vblank need >= 1000us if isp work in online, cur 859 us
[ 1930.776050] rkcif-mipi-lvds: Warning: vblank need >= 1000us if isp work in online, cur 859 us
Redistribute latency...
0:00:01.8 / 99:99:99.
❸ Preview camera1.
1./rockchip-test/camera/boardcon-camera1-test.sh
2.17 Video Playback
2.17.1 Built-in playback
The script instruction directory is in /rockchip-test/video/, just run it.
root@rv1126b-buildroot:/# ls /rockchip-test/video/
test_gst_multivideo.sh       test_gst_video_fps.sh     video_test.sh
test_gst_video.sh            test_gst_video_maxfps.sh
test_gst_video_benchmark.sh  video_stresstest.sh
root@rv1126b-buildroot:/# /rockchip-test/video/test_gst_video.sh
Setting pipeline to PAUSED ...
Pipeline is PREROLLING ...
Redistribute latency...
mpp[1734]: mpp_info: mpp version: 1ea951af author: xiaoxu.chen   2025-07-01 fix[base]: Fix enc cfg size
mpp[1734]: mpp_info: mpp version: 1ea951af author: xiaoxu.chen   2025-07-01 fix[base]: Fix enc cfg size
mpp[1734]: mpp_info: mpp version: 1ea951af author: xiaoxu.chen   2025-07-01 fix[base]: Fix enc cfg size
mpp[1734]: mpp: unable to create enc vp8 for soc rv1126b unsupported
mpp[1734]: mpp_info: mpp version: 1ea951af author: xiaoxu.chen   2025-07-01 fix[base]: Fix enc cfg size
mpp[1734]: mpp_info: mpp version: 1ea951af author: xiaoxu.chen   2025-07-01 fix[base]: Fix enc cfg size
Redistribute latency...
mpp[1734]: h264d_api: is_avcC=1
mpp[1734]: mpp_buf_slot: mismatch h_stride_by_pixel 1472 - 1280
mpp[1734]: mpp_buf_slot: mismatch h_stride_by_byte 1472 - 1280
mpp[1734]: mpp_buf_slot: mismatch size_total 1589760 - 1843200
mpp[1734]: mpp_buf_slot: mismatch h_stride_by_pixel 1472 - 1280
mpp[1734]: mpp_buf_slot: mismatch h_stride_by_byte 1472 - 1280
mpp[1734]: mpp_buf_slot: mismatch size_total 1589760 - 1843200
Pipeline is PREROLLED ...
Prerolled, waiting for async message to finish...
Setting pipeline to PLAYING ...
Redistribute latency...
New clock: GstSystemClock
0:00:24.3 / 0:00:29.5 (82.2 %)
2.17.2 Command line
1amixer -c 0 cset numid=37 2
2gst-play-1.0 --videosink="waylandsink fullscreen=true" /mnt/udisk/video/1080P30/1080P30-H264_haidi.mp4
Command explanation:
amixer -c 0 cset numid=37 2 specifies the Audio output device.
/mnt/udisk/video/1080P30/1080P30-H264_haidi.mp4 the media file path to be played.